Web 模拟终端博客系统
前段时间做了一个非常有意思的模拟终端的展示页: http://ursb.me/terminal/ (没有做移动端适配,请在PC端访问),这个页面非常有意思,它可以作为个人博客系统或者给 Linux 初学者学习终端命令,现分享给大家~
0x01 样式
打开页面效果如下图所示:
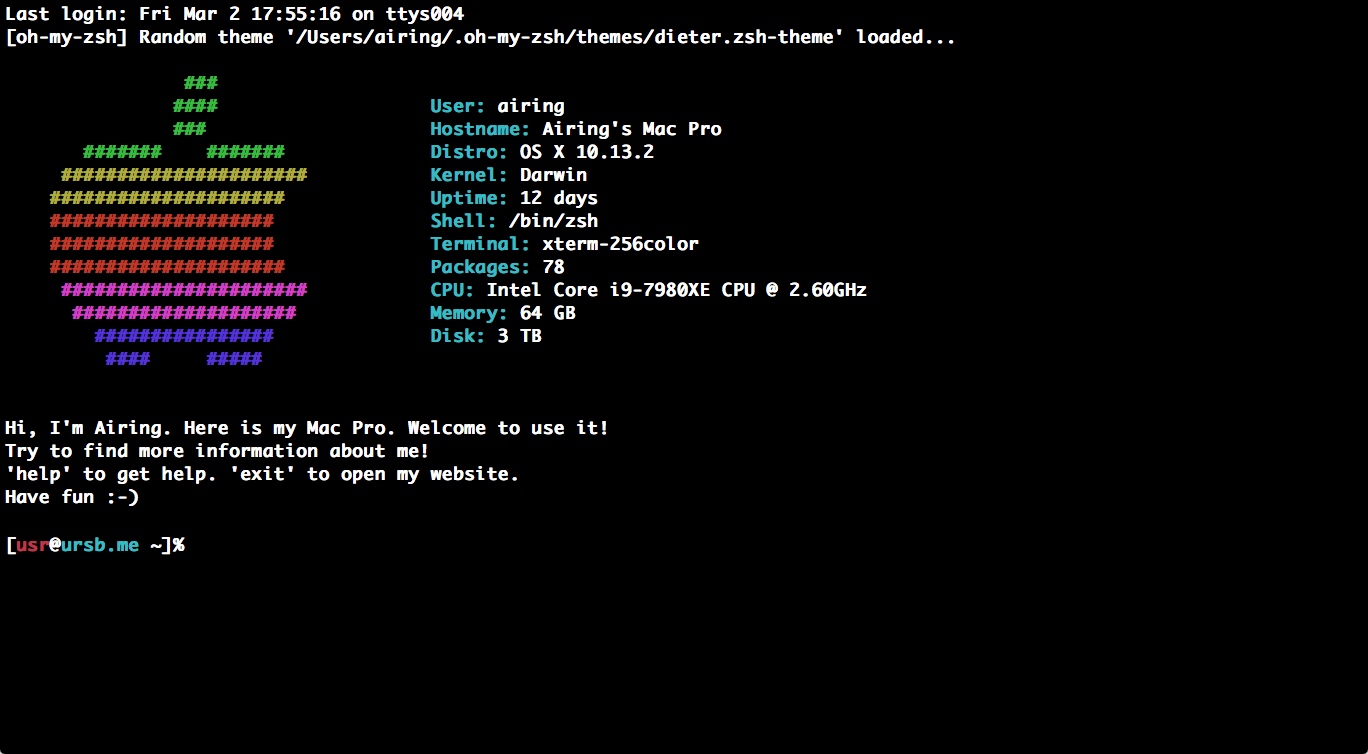
其实这里的样式就直接 Copy 了自己 Mac 上 Terminal 的界面,当然界面上的参数都是自己写的,表示穷人没有钱买这么高配的电脑…
注:截图里面的 logo 是通过archey打印出来的,mac直接输入 brew install archey 即可安装。
命令输入其实只用了一个
input
标签实现的:
当然,原始的样式太丑了,肯定要对
input
标签做美化:
  css
.input-text {
    display: inline-block;
    background-color: transparent;
    border: none;
    -moz-appearance: none;
    -webkit-appearance: none;
    outline: 0;
    box-sizing: border-box;
    font-size: 17px;
    font-family: Monaco, Cutive Mono, Courier New, Consolas, monospace;
    font-weight: 700;
    color: #fff;
    width: 300px;
    padding-block-end: 0
}
虽然是在浏览器访问,但毕竟我们要模拟终端的效果,因此对鼠标的样式最好也修改一下:
  css
* {
    cursor: text;
}
0x02 渲染逻辑
每次打印新的内容其实是一个在之前 html 的基础上拼接新的内容再重新绘制的过程。渲染时机是用户按下回车键,因此需要监听keydown事件;渲染函数是mainFunc,传入用户输入的内容和用户当前的目录,后者是全局变量,在很多命令中都需要判断用户当前的位置。
  JavaScript
e_main.html($('#main').html() + '[<span id="usr">' + usrName + '</span>@<span class="v1a_1f90_9022fb7 host">ursb.me</span> ' + position + ']% ' + input + '<br/>Nice to Meet U : )<br/>')
e_html.animate({ scrollTop: $(document).height() }, 0)
每次渲染之后记得加个滚动动画,让浏览器尽可能真实地模拟终端的行为。
```JavaScript $(document).bind('keydown', function (b) { e_input.focus() if (b.keyCode === 13) { e_main.html($('#main').html()) e_html.animate({ scrollTop: $(document).height() }, 0) mainFunc(e_input.val(), nowPosition) hisCommand.push(e_input.val()) isInHis = 0 e_input.val('') }
// Ctrl + U 清空输入快捷键 if (b.keyCode === 85 && b.ctrlKey === true) { e_input.val('') e_input.focus() } }) ```
同时,还实现了一个快捷键 Ctrl + U 清空当前输入,有其他的快捷键读者也可以这样类似去实现。
0x03 help
我们知道,Linux 命令的规范是
command[ Options...]
,以防有用户不了解,首先,我实现了一个最简单的
help
命令字。效果如下:
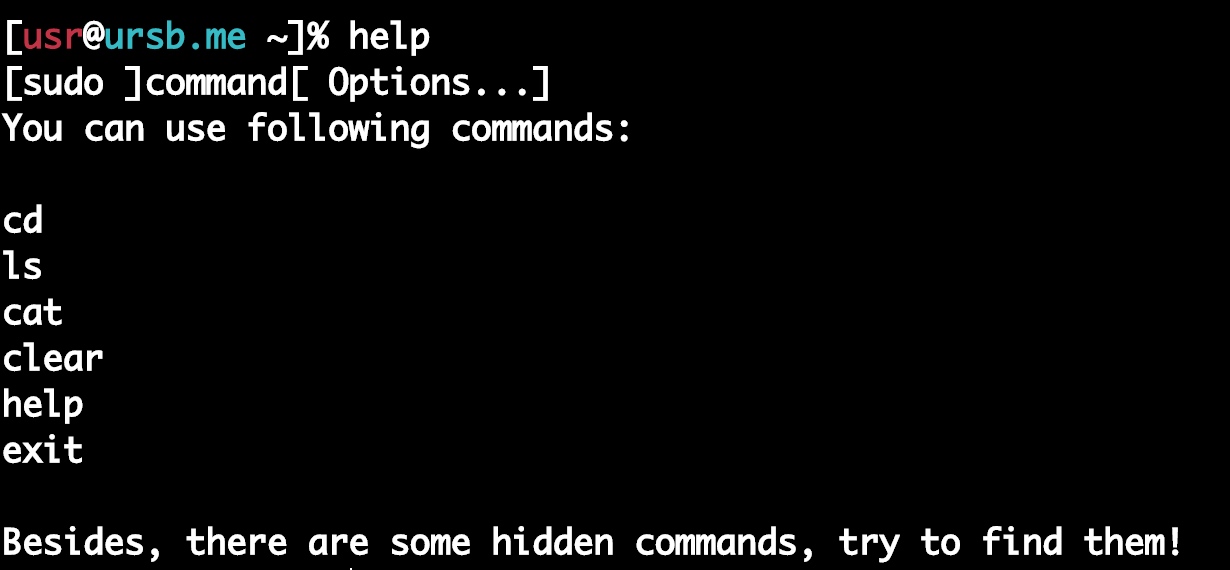
直接看代码,这是直接打印的内容,实现起来非常简单。
  JavaScript
switch (command) {
    case 'help':
      e_main.html($('#main').html() + '[<span id="usr">' + usrName + '</span>@<span class="x41_1623_23044dd host">ursb.me</span> ' + position + ']% ' + input + '<br/>' + '[sudo ]command[ Options...]<br/>You can use following commands:<br/><br/>cd<br/>ls<br/>cat<br/>clear<br/>help<br/>exit<br/><br/>Besides, there are some hidden commands, try to find them!<br/>')
      e_html.animate({ scrollTop: $(document).height() }, 0)
      break
}
其中
command
取 input 标签第一个空格前的元素即可:
  JavaScript
command = input.split(' ')[0]
既然知道了怎么取命令字,那各种打印类型的命令字都是可以自己作为小彩蛋实现~ 这里就不一一举例了,读者可以阅读源码自行了解。
0x04 clear
clear
是清空控制台,实现起来非常简单,根据我们的渲染逻辑,直接清空外层div中的内容即可。
  JavaScript
case 'clear':
  e_main.html('')
  e_html.animate({ scrollTop: $(document).height() }, 0)
  break
既然是博客系统,总不能全部的内容都放在前端页面的代码上进行渲染,固定的
help
命令或者简单的打印命令是这样做是可以的。但如果我们的目录结构变动了,或者想写一篇新文章,或者修改文件的内容,那则需要我们大幅度去修改静态 html 文件的代码,这显然是不现实的。
本系统还配套实现了相应的后台,服务端的作用是用来读取存放在服务端的目录和文件内容,并提供对应的接口以便将数据返回给前端。
服务器存储的文件层级如下:
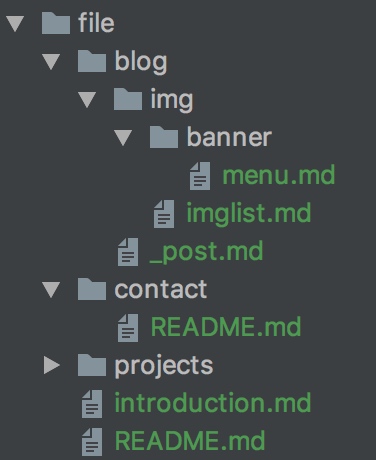
接下来,来看几个稍有难度的功能吧。
0x05 ls
ls
命令用来显示目标列表,在 Linux 中是使用率较高的命令。
ls
命令的输出信息可以进行彩色加亮显示,以分区不同类型的文件。
因此,我们的实现该功能的三个重点是:
- 获取用户当前的位置
- 获取当前位置下的所有文件和目录
- 需要区分出文件和目录,以便区分样式
对于第一点,在
mainFunc
中的第二参数是必传的,它是我们精心维护的一个全局变量(在
cd
命令中进行维护)。
对于第二点,我们在后端提供了一个接口:
  JavaScript
router.get('/ls', (req, res) => {
  let { dir } = req.query
  glob(`src/file${dir}**`, {}, (err, files) => {
    if (dir === '/') {
      files = files.map(i => i.replace('src/file/', ''))
      files = files.filter(i => !i.includes('/')) // 过滤掉二级目录
    } else {
      // 如果不在根目录,则替换掉当前目录
      dir = dir.substring(1)
      files = files.map(i => i.replace('src/file/', '').replace(dir, ''))
      files = files.filter(i => !i.includes('/') && !i.includes(dir.substring(0, dir.length - 1))) // 过滤掉二级目录和当前目录
    }
    return res.jsonp({ code: 0, data: files.map(i => i.replace('src/file/', '').replace(dir, '')) })
  })
})
文件遍历这里我们用到了第三方的开源库glob。如果用户在主目录,我们需要过滤掉二级目录下的文件,因为ls只能看到本目录下的内容;如果用户在其他目录,我们还需要过滤掉当前目录,因为glob返回的数据包含有当前目录的名字。
之后,前端直接调用就好:
前端这里我们根据是否文件名中是否具有'.'来区分是目录和文件的,给目录加上新的样式。但我们这样区分其实并不严谨,因为目录名其实也可以具备'.',目录本质上也是一个文件。严谨的方法应该根据系统的
ls -l
命令判断,我们要实现的博客系统没有这么复杂,因此就简单根据'.'判断也是适用的。
实现效果如下:

0x06 cd
服务端提供接口,pos为用户当前的位置,dir是用户想要切换的相对路径。需要注意的是,这里过滤了文件,因为cd命令后面的参数只能接目录;同时这里并没有过滤掉二级目录,因为cd命令后续接的是目录的路径,有可能是深层级的。对于目录不存在的情况,只需要返回一个错误码和提示即可。
```JavaScript router.get('/cd', (req, res) => { let { pos, dir } = req.query
glob(
src/file${pos}**
, {}, (err, files) => {
pos = pos.substring(1)
files = files.filter(i => !i.includes('.')) // 过滤掉文件
files = files.map(i => i.replace('src/file/', '').replace(pos, ''))
dir = dir.substring(0, dir.length - 1)
if (files.indexOf(dir) === -1) {
// 目录不存在
return res.jsonp({ code: 404, message: 'cd: no such file or directory: ' + dir })
} else {
return res.jsonp({ code: 0 })
}
})
})
```
前端直接调用就好,但是这里要区分几种情况:
- 回退到主目录:cd || cd ~ || cd ~/
-
切换到其他目录
- 用户在主目录:cd ~/dir || cd ./dir || cd dir
-
用户在其他目录:cd .. || cd ../ || cd ../dir || cd dir || cd ./dir
- 切换到绝对路径的其他层级:cd ~/dir
- 切换为相对路径的更深层级:cd dir || cd ./dir || cd ../dir || cd .. || cd ../ || cd ../../
对于情境1,实现比较简单,直接将当前目录切回'~'即可。
  JavaScript
if (!input.split(' ')[1] || input.split(' ')[1] === '~' || input.split(' ')[1] === '~/') {
    // 回退到主目录:cd || cd ~ || cd ~/
    nowPosition = '~'
    e_main.html($('#main').html() + '[<span id="usr">' + usrName + '</span>@<span class="A73_65f7_f7d5000 host">ursb.me</span> ' + position + ']% ' + input + '<br/>')
    e_html.animate({ scrollTop: $(document).height() }, 0)
    e_pos.html(nowPosition)
}
对于情境2之所以还判断是否在主目录,是因为解析规则不一样。其实也可以做个兼容合并成一种情况。由于代码比较长,这里只列出最复杂的情境2.2.2的代码:
```JavaScript let pos = '/' + nowPosition.replace('~/', '') + '/' let backCount = input.split(' ')[1].match(/..\//g) && input.split(' ')[1].match(/..\//g).length || 0
pos = nowPosition.split('/') // [~, blog, img] nowPosition = pos.slice(0, pos.length - backCount) // [~, blog] nowPosition = nowPosition.join('/') // ~/blog
pos = '/' + nowPosition.replace('~', '').replace('/', '') + '/'
dir = dir + '/'
dir = dir.startsWith('./') && dir.substring(1) || dir // 适配:cd ./dir
$.ajax({
url: host + '/cd',
data: { dir, pos },
dataType: 'jsonp',
success: (res) => {
if (res.code === 0) {
nowPosition = '~' + pos.substring(1) + dir.substring(0, dir.length - 1) // ~/blog/img
e_main.html($('#main').html() + '[
' + usrName + '
@
ursb.me
' + position + ']% ' + input + '
')
e_html.animate({ scrollTop: $(document).height() }, 0)
e_pos.html(nowPosition)
} else if (res.code === 404) {
e_main.html($('#main').html() + '[
' + usrName + '
@
ursb.me
' + position + ']% ' + input + '
' + res.message + '
')
e_html.animate({ scrollTop: $(document).height() }, 0)
}
}
})
```
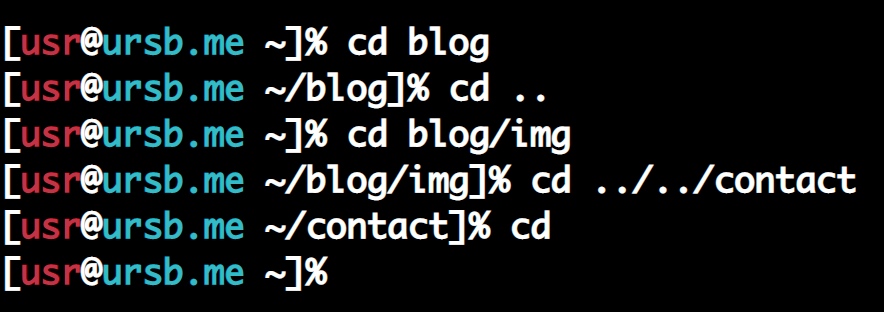
核心环节是计算回退层数,并根据回退层数判断出回退后的路径应该是什么。回退层数用正则匹配出路径中'../'的数量即可,而路径计算则通过数组和字符串的相互转换可以轻易实现。
效果如下:
0x07 cat
cat 命令的实现和 cd 基本一致,只需要将目录处理换成文件处理即可。
服务端提供接口:
```JavaScript router.get('/cat', (req, res) => { let { filename, dir } = req.query
// 多级目录拼接: 位于 ~/blog/img, cat banner/menu.md dir = (dir + filename).split('/') filename = dir.pop() // 丢弃最后一级,其肯定是文件 dir = dir.join('/') + '/'
glob(
src/file${dir}*.md
, {}, (err, files) => {
dir = dir.substring(1)
files = files.map(i => i.replace('src/file/', '').replace(dir, ''))
filename = filename.replace('./', '')
if (files.indexOf(filename) === -1) {
  return res.jsonp({ code: 404, message: 'cat: no such file or directory: ' + filename })
} else {
  fs.readFile(`src/file/${dir}/${filename}`, 'utf-8', (err, data) => {
    return res.jsonp({ code: 0, data })
  })
}
}) }) ```
这里的目录拼接计算放在了服务端完成,和之前的拼接方法基本一样,因为与 cd 命令不同,这里 nowPosition 不会发生改变,所以可放在服务端计算。
若文件存在,读取文件内容返回即可;文件不存在,则返回一个错误码和提示。
与 cd 不同的是, cat 更加简单,前端不需要区分那么多种情况了,直接调用就好。因为我们不需要再维护 nowPosition 去计算当前路径,glob 支持相对路径。
实现效果如下:

0x08 自动补全
熟悉命令行的童鞋应该都知道命令行的效率其实大部分情况都比图形界面快得多,最主要的一点是因为命令行工具支持 Tab 自动补全命令,这使得用户只需短短几个字符就可以敲出一大串命令。如此使用且基础的功能,我们当然也是需要实现的。
所谓自动补全,前提必然是系统知道补全之后的完整内容是啥。我们的模拟终端暂时只是文件和目录的读取操作,所以自动补全的前提是,系统存储有完整的目录和文件。
这里用两个全局变量来分别存储目录和文件的数据就好,在页面一打开时调用:
  JavaScript
$(document).ready(() => {
  // 初始化目录和文件
  $.ajax({
    url: host + '/list',
    data: { dir: '/' },
    dataType: 'jsonp',
    success: (res) => {
      if (res.code === 0) {
        directory = res.data.directory
        directory.shift(); // 去掉第一个 ~
        files = res.data.files
      }
    }
  })
})
服务端接口实现如下:
  ``JavaScript
router.get('/list', (req, res) => {
  // 用于获取所有目录和所有文件
  let { dir } = req.query
  glob(
src/file${dir}**`, {}, (err, files) => {
if (dir === '/') {
files = files.map(i => i.replace('src/file/', ''))
}
files[0] = '~' // 初始化主目录
let directory = files.filter(i => !i.includes('.')) // 过滤掉文件
files = files.filter(i => i.includes('.')) // 只保留文件
// 文件根据层级排序(默认为首字母排序),以便前端实现最短层级优先匹配
files = files.sort((a, b) => {
  let deapA = a.match(/\//g) && a.match(/\//g).length || 0
  let deapB = b.match(/\//g) && b.match(/\//g).length || 0

  return deapA - deapB
})

return res.jsonp({ code: 0, data: {directory, files }})
}) }) ```
额,注释写的比较详尽,看注释就好了…最后得到的两个数组结构如下:
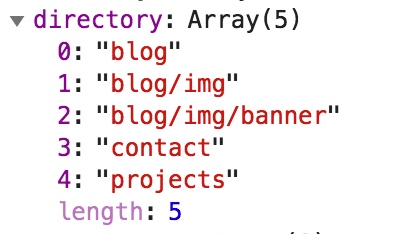
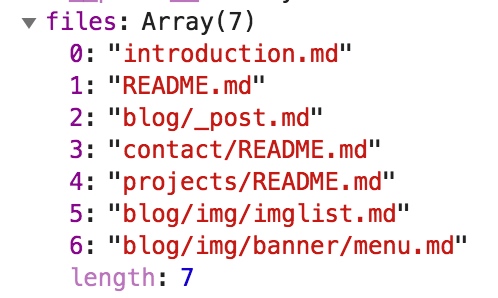
需要注意的是,对于目录而言,我们用的是默认的字符表的顺序排序的,因为 cd 到某目录的自动补全,应该遵循最短路径匹配;而对于文件而言,我们根据层级深度拍排序的,因为 cat 某文件,是根据最浅路径匹配的,即应优先匹配当前目录下的文件。
前端需要监听 Tab 键的 keydown 事件:
  JavaScript
if (b.keyCode === 9) {
    pressTab(e_input.val())
    b.preventDefault()
    e_html.animate({ scrollTop: $(document).height() }, 0)
    e_input.focus()
  }
对于pressTab函数,分成了三类情况(因为我们实现的带参数的命令只有cat和cd):
- 补全命令
- 补全 cat 命令后的参数
- 补全 cd 命令后的参数
情况1的实现有点蠢萌蠢萌的:
```JavaScript
command = input.split(' ')[0]
if (command === 'l') e_input.val('ls')
if (command === 'c') {
e_main.html($('#main').html() + '[
' + usrName + '
@
ursb.me
' + nowPosition + ']% ' + input + '
cat cd claer
')
}
if (command === 'ca') e_input.val('cat') if (command === 'cl' || command === 'cle' || command === 'clea') e_input.val('clea') ```
对于情况2,cat 命令自动补全只适配文件,即适配我们全局变量files里面的元素,需要注意的是处理好前缀'./'的情况。直接贴代码了:
```JavaScript if (input.split(' ')[1] && command === 'cat') { file = input.split(' ')[1] let pos = nowPosition.replace('~', '').replace('/', '') // 去除主目录的 ~ 和其他目录的 ~/ 前缀 let prefix = ''
if (file.startsWith('./')) {
    prefix = './'
    file = file.replace('./', '')
}

if (nowPosition === '~') {
    files.every(i => {
      if (i.startsWith(pos + file)) {
        e_input.val('cat ' + prefix + i)
        return false
      }
      return true
    })
} else {
    pos = pos + '/'
    files.every(i => {
      if (i.startsWith(pos + file)) {
        e_input.val('cat ' + prefix + i.replace(pos, ''))
        return false
      }
      return true
    })
}
} ```
对于情况3,实现和情况2基本一致,但是 cd 命令自动补全只适配目录,即配我们全局变量directory 里面的元素。由于篇幅问题,且此处实现和以上代码基本重复,就不贴了。
0x09 历史命令
Linux 的终端按上下方向键可以翻阅用户历史输入的命令,这也是一个很重要很基础的功能,所以我们来实现一下。
先来几个全局变量,以便存储用户输入的历史命令。
  JavaScript
let hisCommand = [] // 历史命令
let cour = 0 // 指针
let isInHis = 0 // 是否为当前输入的命令,0是,1否
isInHis 变量用于判断输入内容是否在历史记录里,即用户输入了内容哪怕没有按回车,按了上键之后再按下键也依然可以复现刚才自己输入的内容,不至于清空。(在按回车之后,isInHis = 0)
在监听keydown事件绑定的时候新增上下方向键的监听:
  JavaScript
if (b.keyCode === 38) historyCmd('up')
if (b.keyCode === 40) historyCmd('down')
historyCmd 函数接受的参数则表明用户的翻阅顺序,是前一条还是后一条。
```JavaScript let historyCmd = (k) => { $('body,html').animate({ scrollTop: $(document).height() }, 0)
if (k !== 'up' || isInHis) { if (k === 'up' && isInHis) { if (cour >= 1) { cour-- e_input.val(hisCommand[cour]) } } if (k === 'down' && isInHis) { if (cour + 1 <= hisCommand.length - 1) { cour++ $(".input-text").val(hisCommand[cour]) } else if (cour + 1 === hisCommand.length) { $(".input-text").val(inputCache) } } } else { inputCache = e_input.val() e_input.val(hisCommand[hisCommand.length - 1]) cour = hisCommand.length - 1 isInHis = 1 } } ```
代码实现比较简单,根据上下键移动数组的指针即可。
参考文献
- 博客管理系统的设计与实现(吉林大学·赵岩)
- 基于.NET的微博设计与实现(电子科技大学·谢治)
- 基于SSH框架模式的博客系统的设计与实现(西北师范大学·王刚成)
- 网络流量统计分析系统(吉林大学·石景龙)
- 基于Spring Boot的多用户博客系统的设计研究(青海师范大学·罗涛)
- 基于SSH架构的个人空间交友网站的设计与实现(北京邮电大学·隋昕航)
- 基于SSH架构的个人空间交友网站的设计与实现(北京邮电大学·隋昕航)
- 基于SSH框架的博客用户分享平台的设计与实现(河北工业大学·刘磊)
- 基于SSH2的轻博客系统的研究与实现(吉林大学·杨雪梅)
- 基于Spring Boot的多用户博客系统的设计研究(青海师范大学·罗涛)
- 基于ASP.NET MVC和实体框架的农业论坛的设计与实现(辽宁科技大学·高起跃)
- 基于MD5改进算法的安全教师博客系统设计及开发(湖南大学·刘曼春)
- 基于MD5改进算法的安全教师博客系统设计及开发(湖南大学·刘曼春)
- 基于Spring Boot的多用户博客系统的设计研究(青海师范大学·罗涛)
- 基于Spring Boot的多用户博客系统的设计研究(青海师范大学·罗涛)
本文内容包括但不限于文字、数据、图表及超链接等)均来源于该信息及资料的相关主题。发布者:源码货栈 ,原文地址:https://m.bishedaima.com/yuanma/35951.html


