
基于 Python+Flask+Echarts 的 COVID-19 数据可视化项目
步骤
-
Python 网络爬虫
-
使用 Python 与 MySQL 数据库交互
-
使用 Flask 构建 Web 项目
-
基于 Echarts 数据可视化展示
-
在 Linux 上部署 Web 项目及爬虫
## 文件说明
- app.py是flask的运行程序,整体项目也是运行它
- spider.py是爬取各种数据并存入数据库的,定时爬虫就是定时运行它
- utils.py是数据库的相关操作的封装,spider.py中会调用它的函数
- templates/中
- index.html和test.html是写项目过程中用于测试用的,和项目运行无关,可删
- main.html是前端页面
## 运行方式:
本地win10上:
在mysql数据库中新建cov数据库,并在其中新建3张表details,history,hotsearch——具体见博客 在utils.py和spider.py中更改get_conn函数中的数据库连接,host,user,password,db 运行spider.py爬取数据写入到mysql中 运行app.py
## 1、爬取 yq 数据
有了爬虫基础后,我们可以自行去全国各地的卫健委网站上爬取数据,不过部分网站反爬虫手段很高明,需要专业的反反爬手段
我们也可以去各大平台直接爬取最终数据,比如:
百度
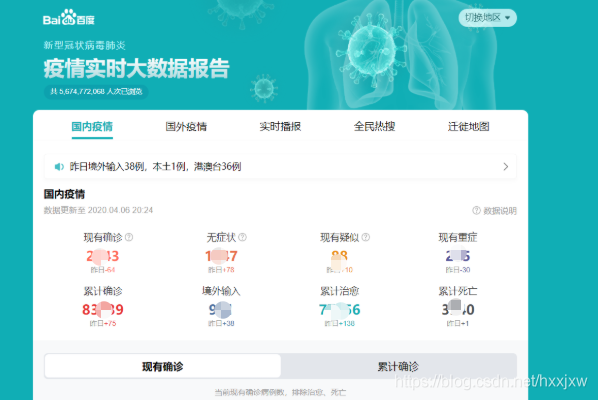
腾讯

爬取腾讯 yq 数据 请见 https://github.com/skyerhxx/COVID-19_Tracking/blob/master/%E7%96%AB%E6%83%85%E6%95%B0%E6%8D%AE%E7%BD%91%E7%AB%99.txt
h5 爬取的数据的 key 值有

other 爬取的数据的 key 值有

但是 h5 爬取的数据后 6 个是空的

所以需要 h5 和 other 的数据结合起来处理
我们需要拿到历史数据和 34 个省的数据
即程序中的 history 和 details
history 从 other 爬取,details 从 h5 爬取
```python
爬取并处理腾讯疫情数据
import requests import json import time
返回历史数据和当日详细数据
def get_tencent_data(): url1 = "https://view.inews.qq.com/g2/getOnsInfo?name=disease_h5" url2 = "https://view.inews.qq.com/g2/getOnsInfo?name=disease_other" headers = { 'user-agent':'Mozilla/5.0 (Windows NT 10.0; Win64; x64) AppleWebKit/537.36 (KHTML, like Gecko) Chrome/78.0.3904.70 Safari/537.36' } r1 = requests.get(url1, headers) r2 = requests.get(url2, headers)
#json字符串转字典
res1 = json.loads(r1.text)
res2 = json.loads(r2.text)
data_all1 = json.loads(res1["data"])
data_all2 = json.loads(res2["data"])
#历史数据
history = {}
for i in data_all2["chinaDayList"]:
ds = "2020." + i["date"]
tup = time.strptime(ds, "%Y.%m.%d") # 匹配时间
ds = time.strftime("%Y-%m-%d", tup) #改变时间输入格式,不然插入数据库会报错,数据库是datatime格式
confirm = i["confirm"]
suspect = i["suspect"]
heal = i["heal"]
dead = i["dead"]
history[ds] = {"confirm": confirm, "suspect": suspect, "heal": heal, "dead": dead}
for i in data_all2["chinaDayAddList"]:
ds = "2020." + i["date"]
tup = time.strptime(ds, "%Y.%m.%d") # 匹配时间
ds = time.strftime("%Y-%m-%d", tup) #改变时间输入格式,不然插入数据库会报错,数据库是datatime格式
confirm = i["confirm"]
suspect = i["suspect"]
heal = i["heal"]
dead = i["dead"]
history[ds].update({"confirm_add": confirm, "suspect_add": suspect, "heal_add": heal, "dead_add": dead})
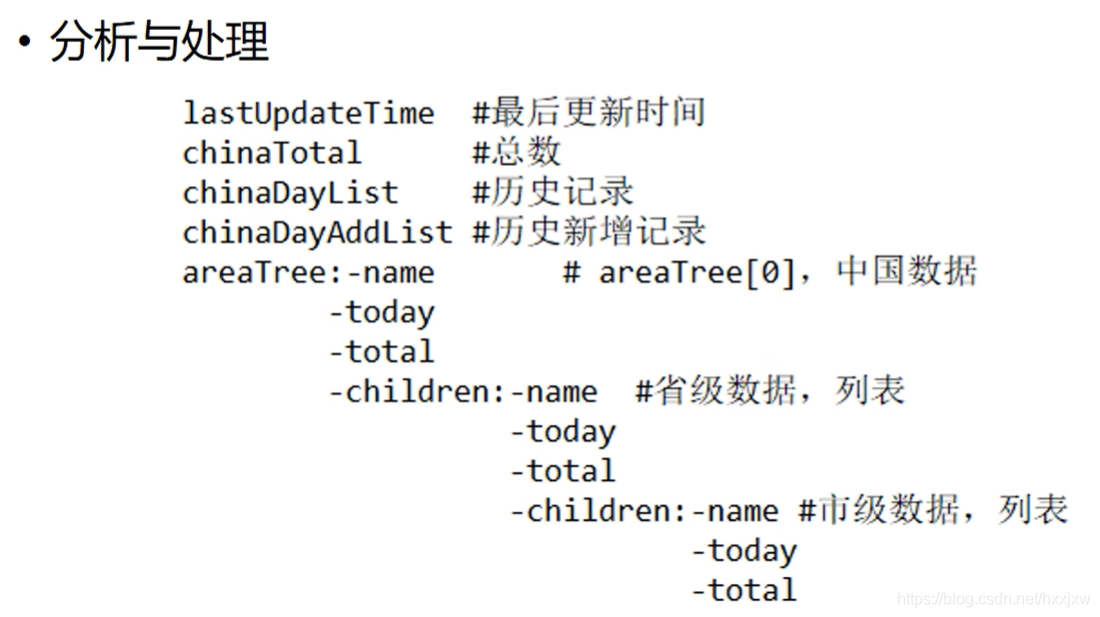
#当日详细数据
details = []
update_time = data_all1["lastUpdateTime"]
data_country = data_all1["areaTree"] #list 25个国家
data_province = data_country[0]["children"] #中国各省
for pro_infos in data_province:
province = pro_infos["name"] #省名
for city_infos in pro_infos["children"]:
city = city_infos["name"]
confirm = city_infos["total"]["confirm"]
confirm_add = city_infos["today"]["confirm"]
heal = city_infos["total"]["heal"]
dead = city_infos["total"]["dead"]
details.append([update_time, province, city, confirm, confirm_add, heal, dead])
return history, details
his,de = get_tencent_data() print(his) print(de) ```
2、yq 数据的存储
数据存储
建立数据库 cov

进入 cov 数据库,建两张表,history 表存储每日总数据,details 表存储每日详细数据
mysql
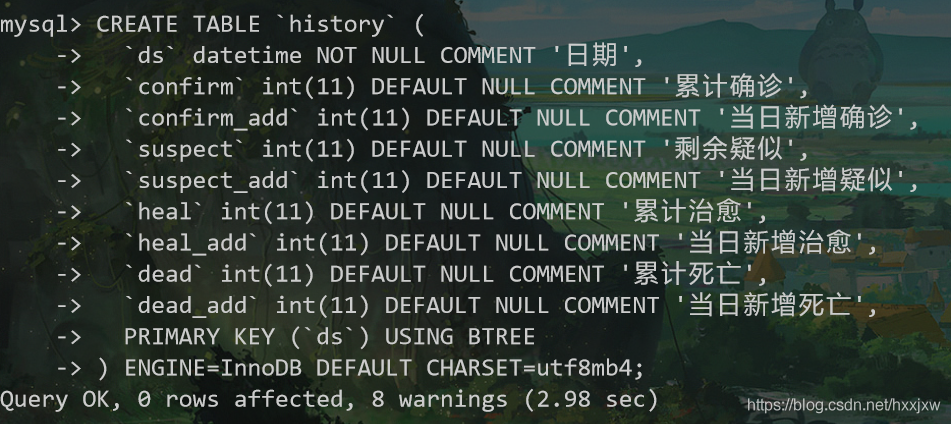
CREATE TABLE `history` (
`ds` datetime NOT NULL COMMENT '日期',
`confirm` int(11) DEFAULT NULL COMMENT '累计确诊',
`confirm_add` int(11) DEFAULT NULL COMMENT '当日新增确诊',
`suspect` int(11) DEFAULT NULL COMMENT '剩余疑似',
`suspect_add` int(11) DEFAULT NULL COMMENT '当日新增疑似',
`heal` int(11) DEFAULT NULL COMMENT '累计治愈',
`heal_add` int(11) DEFAULT NULL COMMENT '当日新增治愈',
`dead` int(11) DEFAULT NULL COMMENT '累计死亡',
`dead_add` int(11) DEFAULT NULL COMMENT '当日新增死亡',
PRIMARY KEY (`ds`) USING BTREE
) ENGINE=InnoDB DEFAULT CHARSET=utf8mb4;

  mysql
CREATE TABLE `details` (
  `id` int(11) NOT NULL AUTO_INCREMENT,
  `update_time` datetime DEFAULT NULL COMMENT '数据最后更新时间',
  `province` varchar(50) DEFAULT NULL COMMENT '省',
  `city` varchar(50) DEFAULT NULL COMMENT '市',
  `confirm` int(11) DEFAULT NULL COMMENT '累计确诊',
  `confirm_add` int(11) DEFAULT NULL COMMENT '新增治愈',
  `heal` int(11) DEFAULT NULL COMMENT '累计治愈',
  `dead` int(11) DEFAULT NULL COMMENT '累计死亡',
  PRIMARY KEY (`id`)
) ENGINE=InnoDB DEFAULT CHARSET=utf8mb4;
将数据存储到数据库中
pymysql 库
```python import requests import json import time import pymysql
返回历史数据和当日详细数据
def get_tencent_data(): url1 = "https://view.inews.qq.com/g2/getOnsInfo?name=disease_h5" url2 = "https://view.inews.qq.com/g2/getOnsInfo?name=disease_other" headers = { 'user-agent':'Mozilla/5.0 (Windows NT 10.0; Win64; x64) AppleWebKit/537.36 (KHTML, like Gecko) Chrome/78.0.3904.70 Safari/537.36' } r1 = requests.get(url1, headers) r2 = requests.get(url2, headers)
#json字符串转字典
res1 = json.loads(r1.text)
res2 = json.loads(r2.text)

data_all1 = json.loads(res1["data"])
data_all2 = json.loads(res2["data"])

#历史数据
history = {}
for i in data_all2["chinaDayList"]:
    ds = "2020." + i["date"]
    tup = time.strptime(ds, "%Y.%m.%d")  # 匹配时间
    ds = time.strftime("%Y-%m-%d", tup)  #改变时间输入格式,不然插入数据库会报错,数据库是datatime格式
    confirm = i["confirm"]
    suspect = i["suspect"]
    heal = i["heal"]
    dead = i["dead"]
    history[ds] = {"confirm": confirm, "suspect": suspect, "heal": heal, "dead": dead}
for i in data_all2["chinaDayAddList"]:
    ds = "2020." + i["date"]
    tup = time.strptime(ds, "%Y.%m.%d")  # 匹配时间
    ds = time.strftime("%Y-%m-%d", tup)  #改变时间输入格式,不然插入数据库会报错,数据库是datatime格式
    confirm = i["confirm"]
    suspect = i["suspect"]
    heal = i["heal"]
    dead = i["dead"]
    history[ds].update({"confirm_add": confirm, "suspect_add": suspect, "heal_add": heal, "dead_add": dead})

#当日详细数据
details = []
update_time = data_all1["lastUpdateTime"]
data_country = data_all1["areaTree"]  #list 25个国家
data_province = data_country[0]["children"] #中国各省
for pro_infos in data_province:
    province = pro_infos["name"] #省名
    for city_infos in pro_infos["children"]:
        city = city_infos["name"]
        confirm = city_infos["total"]["confirm"]
        confirm_add = city_infos["today"]["confirm"]
        heal = city_infos["total"]["heal"]
        dead = city_infos["total"]["dead"]
        details.append([update_time, province, city, confirm, confirm_add, heal, dead])
return history, details
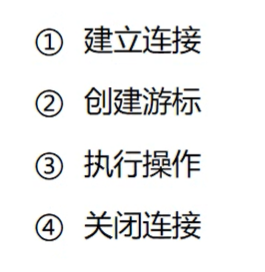
def get_conn(): #建立连接 conn = pymysql.connect(host="127.0.0.1", user="root", password="*", db="cov", charset="utf8") #创建游标 cursor = conn.cursor() return conn,cursor
def close_conn(conn,cursor): if cursor: cursor.close() if conn: conn.close()
插入details数据
def update_details(): cursor = None conn = None try: li = get_tencent_data()[1] #0是历史数据,1是当日详细数据 conn,cursor = get_conn() sql = "insert into details(update_time,province,city,confirm,confirm_add,heal,dead) values(%s,%s,%s,%s,%s,%s,%s)" sql_query = "select %s=(select update_time from details order by id desc limit 1)" #对比当前最大时间戳 #对比当前最大时间戳 cursor.execute(sql_query,li[0][0]) if not cursor.fetchone()[0]: print(f"{time.asctime()}开始更新数据") for item in li: cursor.execute(sql,item) conn.commit() print(f"{time.asctime()}更新到最新数据") else: print(f"{time.asctime()}已是最新数据!") except: traceback.print_exc() finally: close_conn(conn,cursor)
插入history数据
def insert_history(): cursor = None conn = None try: dic = get_tencent_data()[0]#0代表历史数据字典 print(f"{time.asctime()}开始插入历史数据") conn,cursor = get_conn() sql = "insert into history values (%s,%s,%s,%s,%s,%s,%s,%s,%s)" for k,v in dic.items(): cursor.execute(sql,[k, v.get("confirm"),v.get("confirm_add"),v.get("suspect"), v.get("suspect_add"),v.get("heal"),v.get("heal_add"), v.get("dead"),v.get("dead_add")]) conn.commit() print(f"{time.asctime()}插入历史数据完毕") except: traceback.print_exc() finally: close_conn(conn,cursor)
更新历史数据
def update_history(): cursor = None conn = None try: dic = get_tencent_data()[0]#0代表历史数据字典 print(f"{time.asctime()}开始更新历史数据") conn,cursor = get_conn() sql = "insert into history values (%s,%s,%s,%s,%s,%s,%s,%s,%s)" sql_query = "select confirm from history where ds=%s" for k,v in dic.items(): if not cursor.execute(sql_query,k): cursor.execute(sql,[k, v.get("confirm"),v.get("confirm_add"),v.get("suspect"), v.get("suspect_add"),v.get("heal"),v.get("heal_add"), v.get("dead"),v.get("dead_add")]) conn.commit() print(f"{time.asctime()}历史数据更新完毕") except: traceback.print_exc() finally: close_conn(conn,cursor)
his,de = get_tencent_data()
print(his)
print(de)
insert_history() update_details() ```
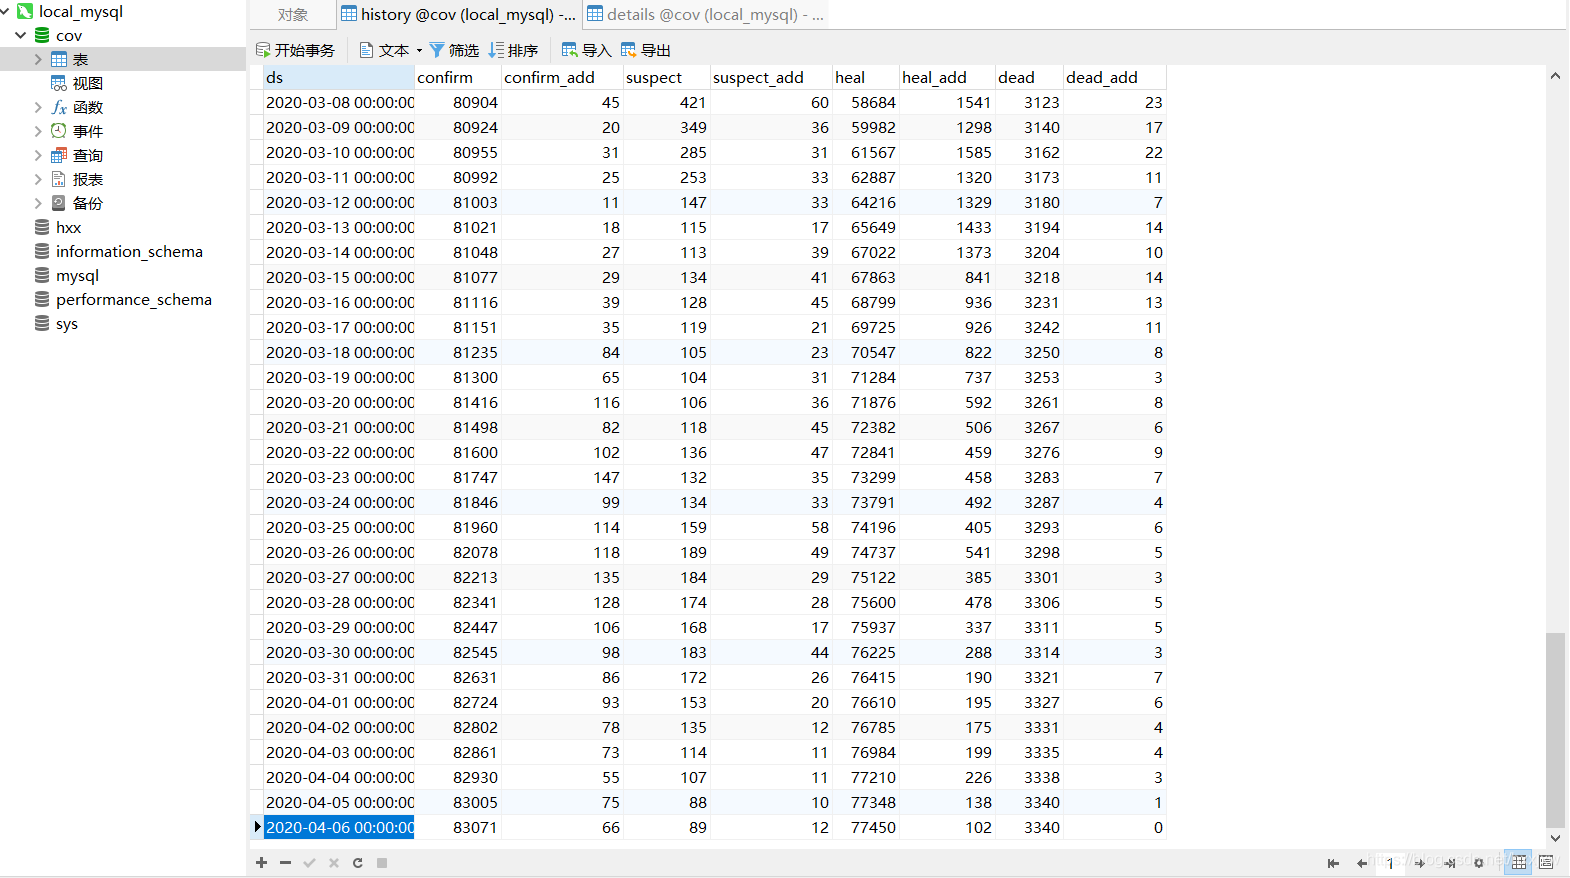
history 数据库
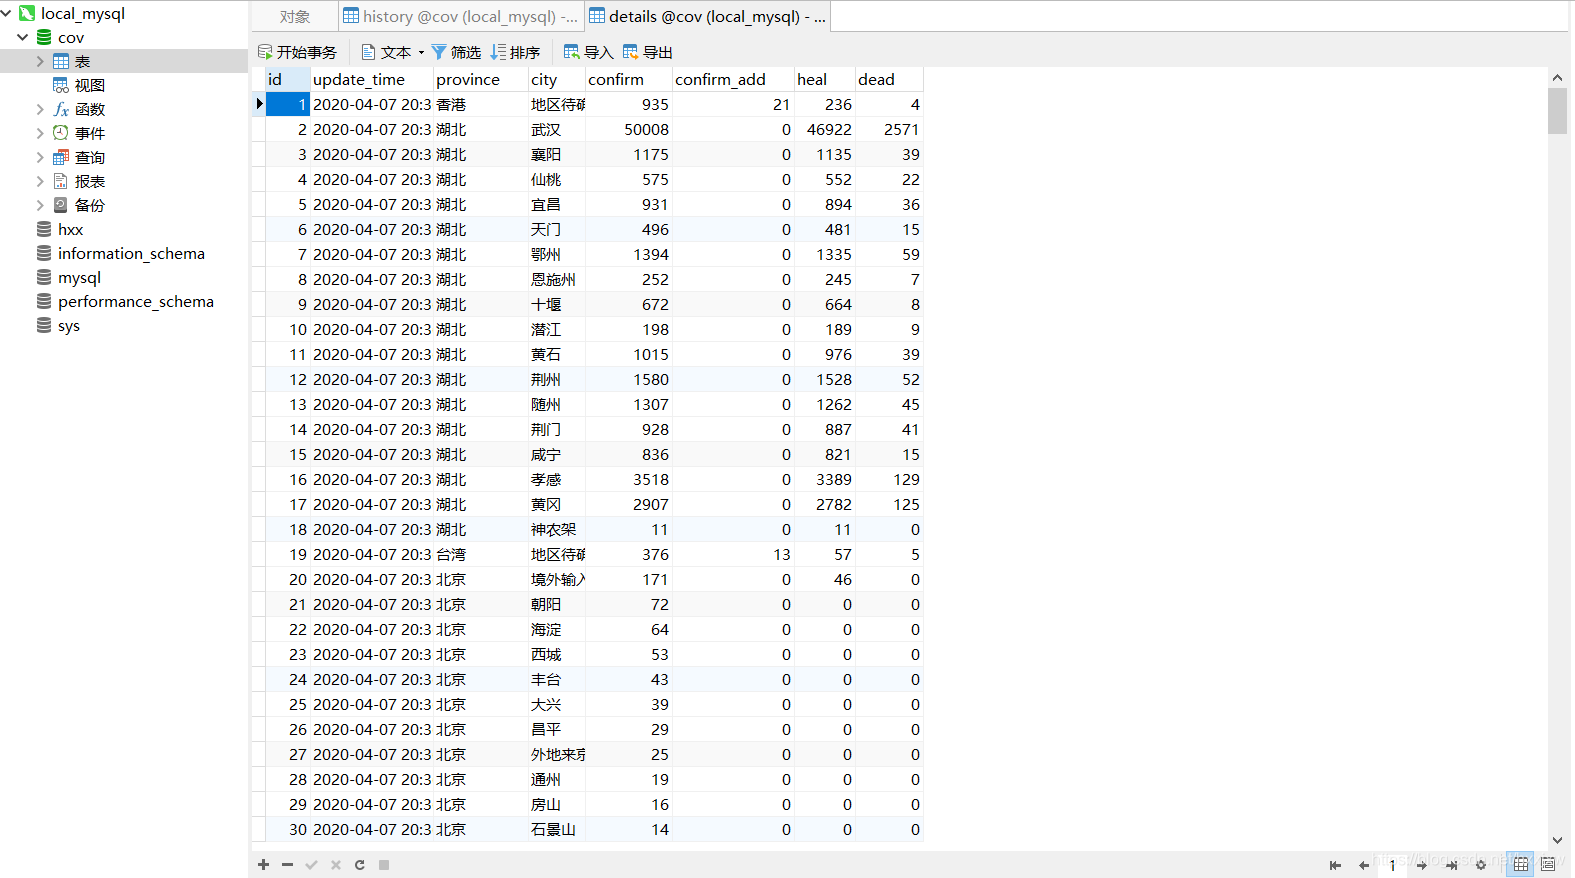
details 数据

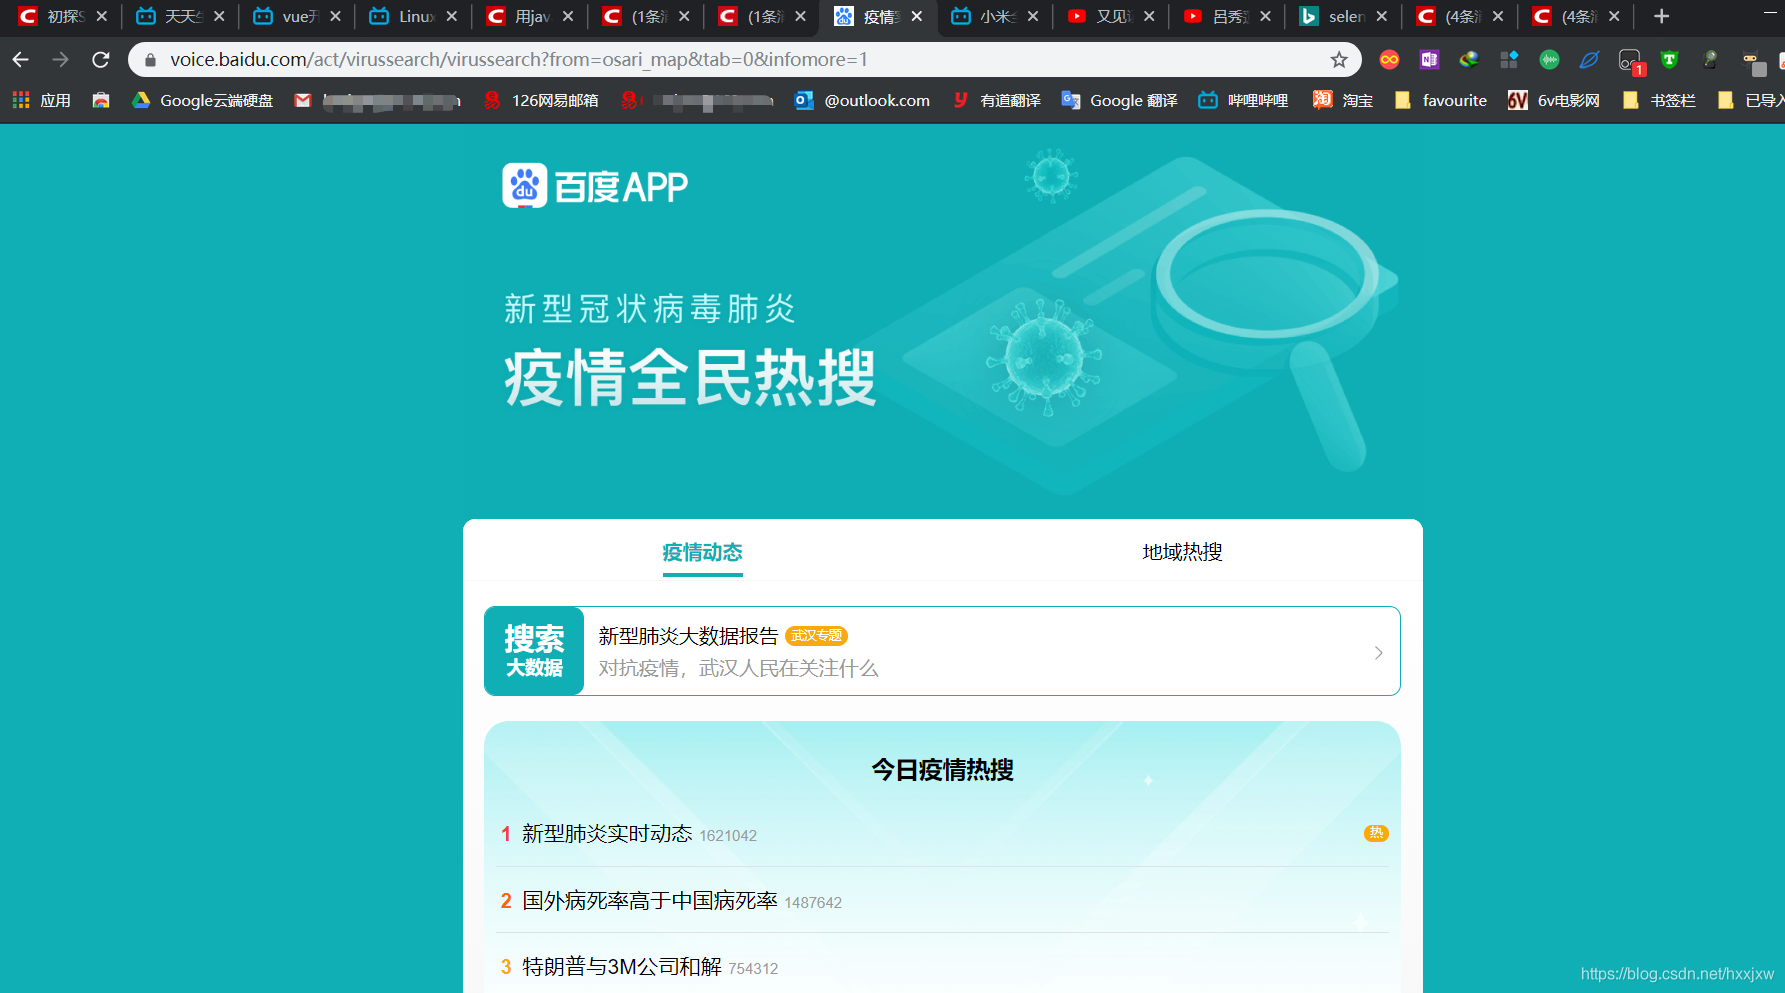
3、爬取百度热搜数据
即我们要爬取百度的疫情数据平台的今日疫情热搜
注意网址不一样,不是之前那个百度的疫情平台点全民热搜那样子出来的
 对
对
 错
错
百度的数据页面是采用了动态渲染数据,即它使用 js 来生成数据,数据不是 HTML 静态的,我们用普通爬虫是爬不到的
但我们可以用selenium爬取。selenium是模拟用户操作,就可以看到js返回的数据了
xpath 是怎么确定的呢
在通过 selenium 打开的页面中 F12
点击箭头选中热搜元素后定位到其源码

右键选择 复制 xpath

ctrl+F 打开搜索,可以验证我们复制的 xpath 对不对
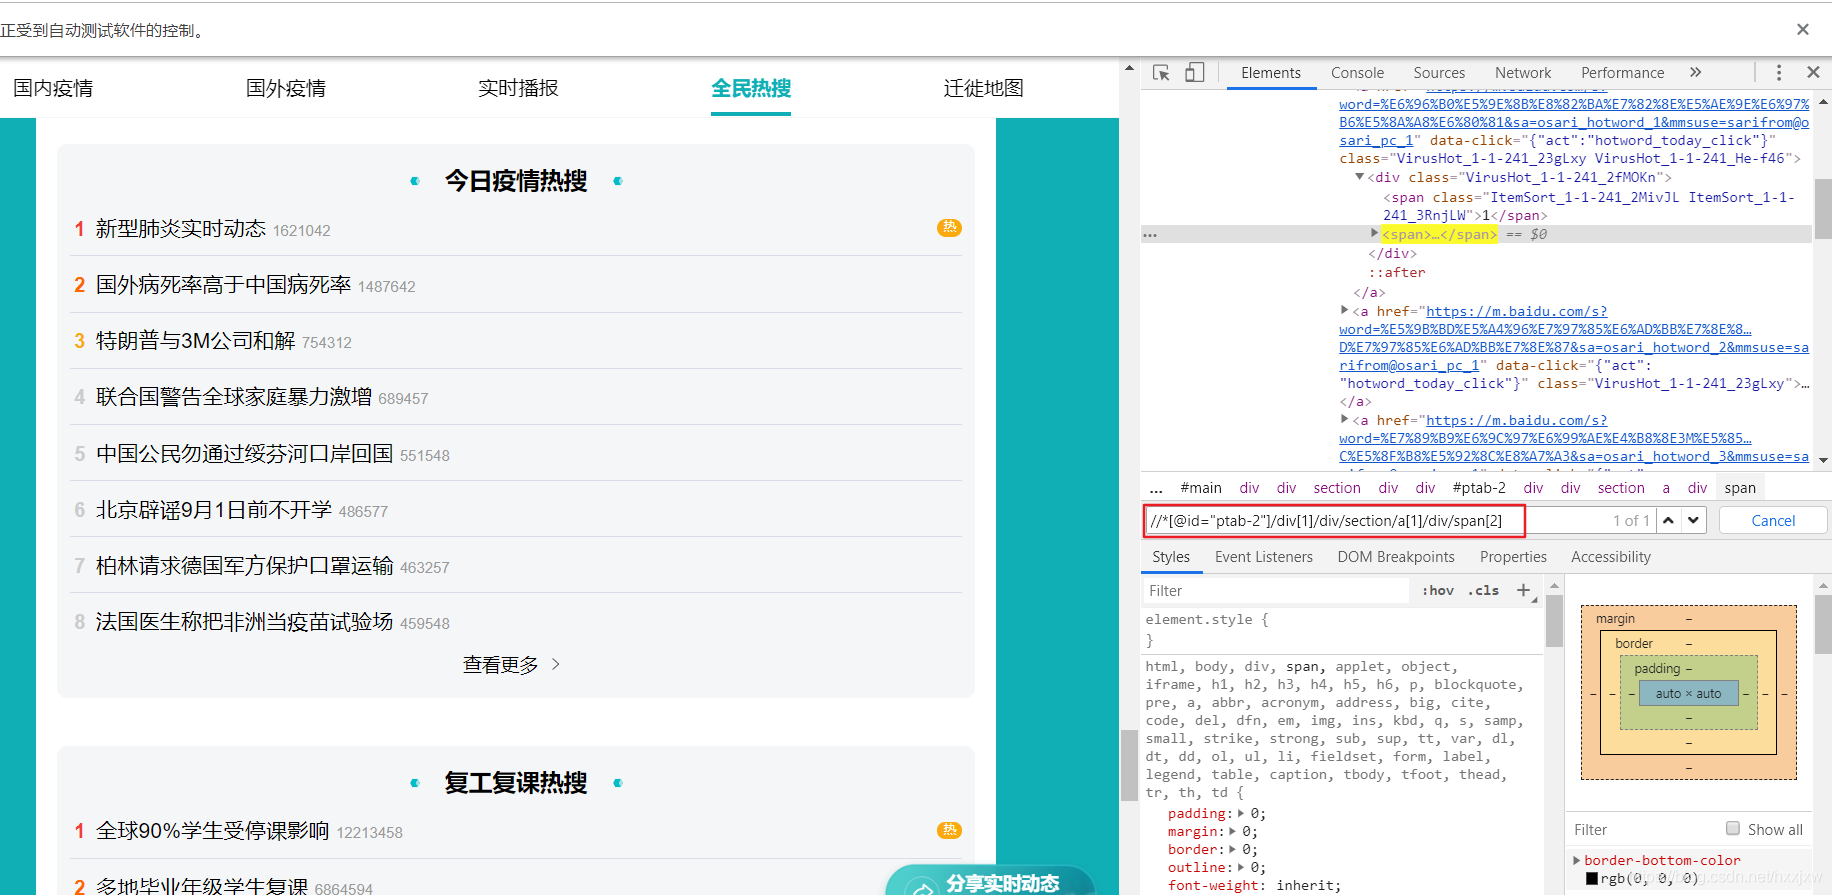
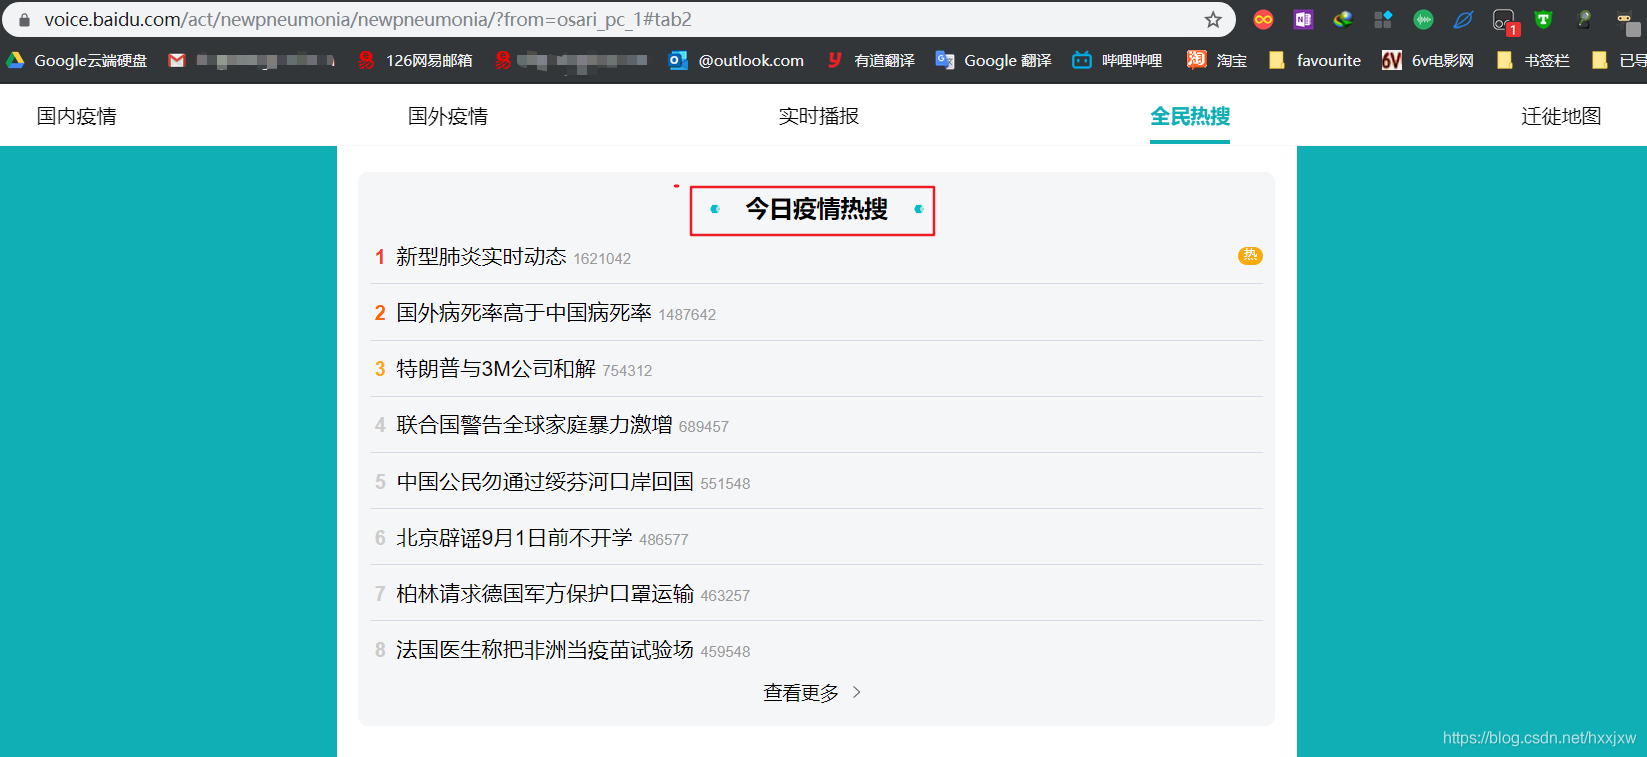
然后就看这个 xpath,试了一下将 a[1]的 1 去掉,换成 a,就正好能定位到 8 条,即热搜前 8
这个 8 是因为上图的今日疫情热搜只显示到 8,如果点开查看更多还多
```python from selenium.webdriver import Chrome,ChromeOptions
url = 'https://voice.baidu.com/act/virussearch/virussearch?from=osari_map&tab=0&infomore=1' brower = Chrome() brower.get(url) c = brower.find_elements_by_xpath('//*[@id="ptab-0"]/div/div[2]/section/a/div/span[2]') for i in c: print(i.text) ```

之后再设置不打开浏览器在后台自动加载数据
总的:
```python from selenium.webdriver import Chrome,ChromeOptions import time
option = ChromeOptions() option.add_argument("--headless")#隐藏浏览器 option.add_argument("--no-sandbox") #禁用沙盘 部署在linux上访问chrome要求这样 url = 'https://voice.baidu.com/act/virussearch/virussearch?from=osari_map&tab=0&infomore=1'
brower = Chrome(options = option)
brower = Chrome()
brower.get(url) but = brower.find_element_by_css_selector('#ptab-0 > div > div.VirusHot_1-5-5_32AY4F.VirusHot_1-5-5_2RnRvg > section > div') #定位到点击展开按钮 but.click() #点击展开
time.sleep(1)#爬虫与反爬,模拟人等待1秒 c = brower.find_elements_by_xpath('//*[@id="ptab-0"]/div/div[2]/section/a/div/span[2]') for i in c: print(i.text) ```
存储百度热搜数据到 MySQL
这次在 navicat 上建表
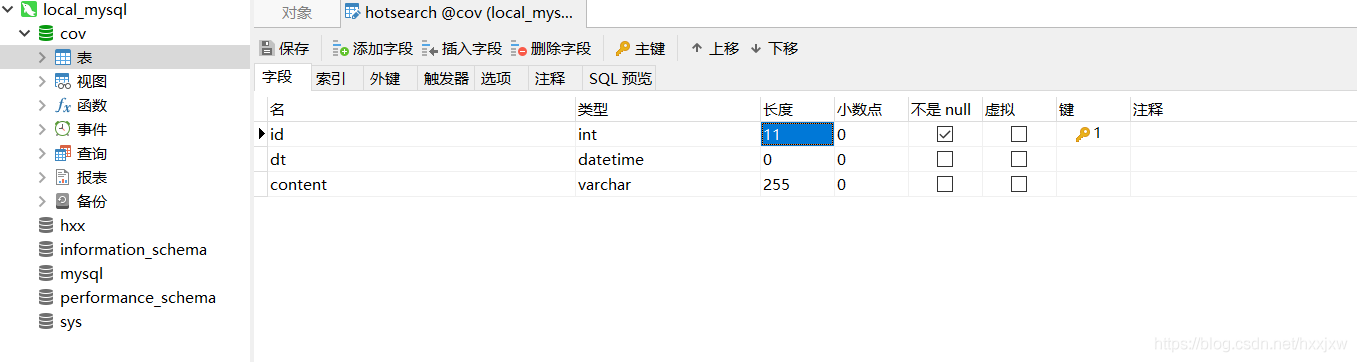
注意 id 要设置成递增的,在页面下面有个选项要勾选
  mysql
CREATE TABLE `hotsearch` (
  `id` int(11) NOT NULL AUTO_INCREMENT,
  `dt` datetime DEFAULT NULL ON UPDATE CURRENT_TIMESTAMP,
  `content` varchar(255) DEFAULT NULL,
  PRIMARY KEY (`id`)
) ENGINE=InnoDB DEFAULT CHARSET=utf8mb4;
```python import requests import json import time import pymysql from selenium.webdriver import Chrome,ChromeOptions
def get_conn(): #建立连接 conn = pymysql.connect(host="127.0.0.1", user="root", password="root", db="cov", charset="utf8") #创建游标 cursor = conn.cursor() return conn,cursor
def close_conn(conn,cursor): if cursor: cursor.close() if conn: conn.close()
返回百度疫情热搜
def get_baidu_hot(): option = ChromeOptions() #创建谷歌浏览器实例 option.add_argument("--headless")#隐藏浏览器 option.add_argument("--no-sandbox") #禁用沙盘 部署在linux上访问chrome要求这样
url = 'https://voice.baidu.com/act/virussearch/virussearch?from=osari_map&tab=0&infomore=1'
brower = Chrome(options = option)
brower.get(url)
#找到展开按钮
but = brower.find_element_by_css_selector('#ptab-0 > div > div.VirusHot_1-5-5_32AY4F.VirusHot_1-5-5_2RnRvg > section > div') #定位到点击展开按钮
but.click() #点击展开

time.sleep(1)#爬虫与反爬,模拟人等待1秒

c = brower.find_elements_by_xpath('//*[@id="ptab-0"]/div/div[2]/section/a/div/span[2]')
context = [i.text for i in c]  #获取标签内容
print(context)
return context
将疫情热搜插入数据库
def update_hotsearch(): cursor = None conn = None try: context = get_baidu_hot() print(f"{time.asctime()}开始更新热搜数据") conn, cursor = get_conn() sql = "insert into hotsearch(dt,content) values(%s,%s)" ts = time.strftime("%Y-%m-%d %X") for i in context: cursor.execute(sql,(ts,i)) #插入数据 conn.commit() #提交事务保存数据 print(f"{time.asctime()}数据更新完毕") except: traceback.print_exc() finally: close_conn(conn,cursor)
update_hotsearch() ```

4、Flask & 使用 AJAX 局部刷新页面
https://blog.csdn.net/hxxjxw/article/details/104781356
5、可视化大屏制作
https://blog.csdn.net/hxxjxw/article/details/104804186
可视化大屏是 main.html
6、关键数字和时间的实时更新
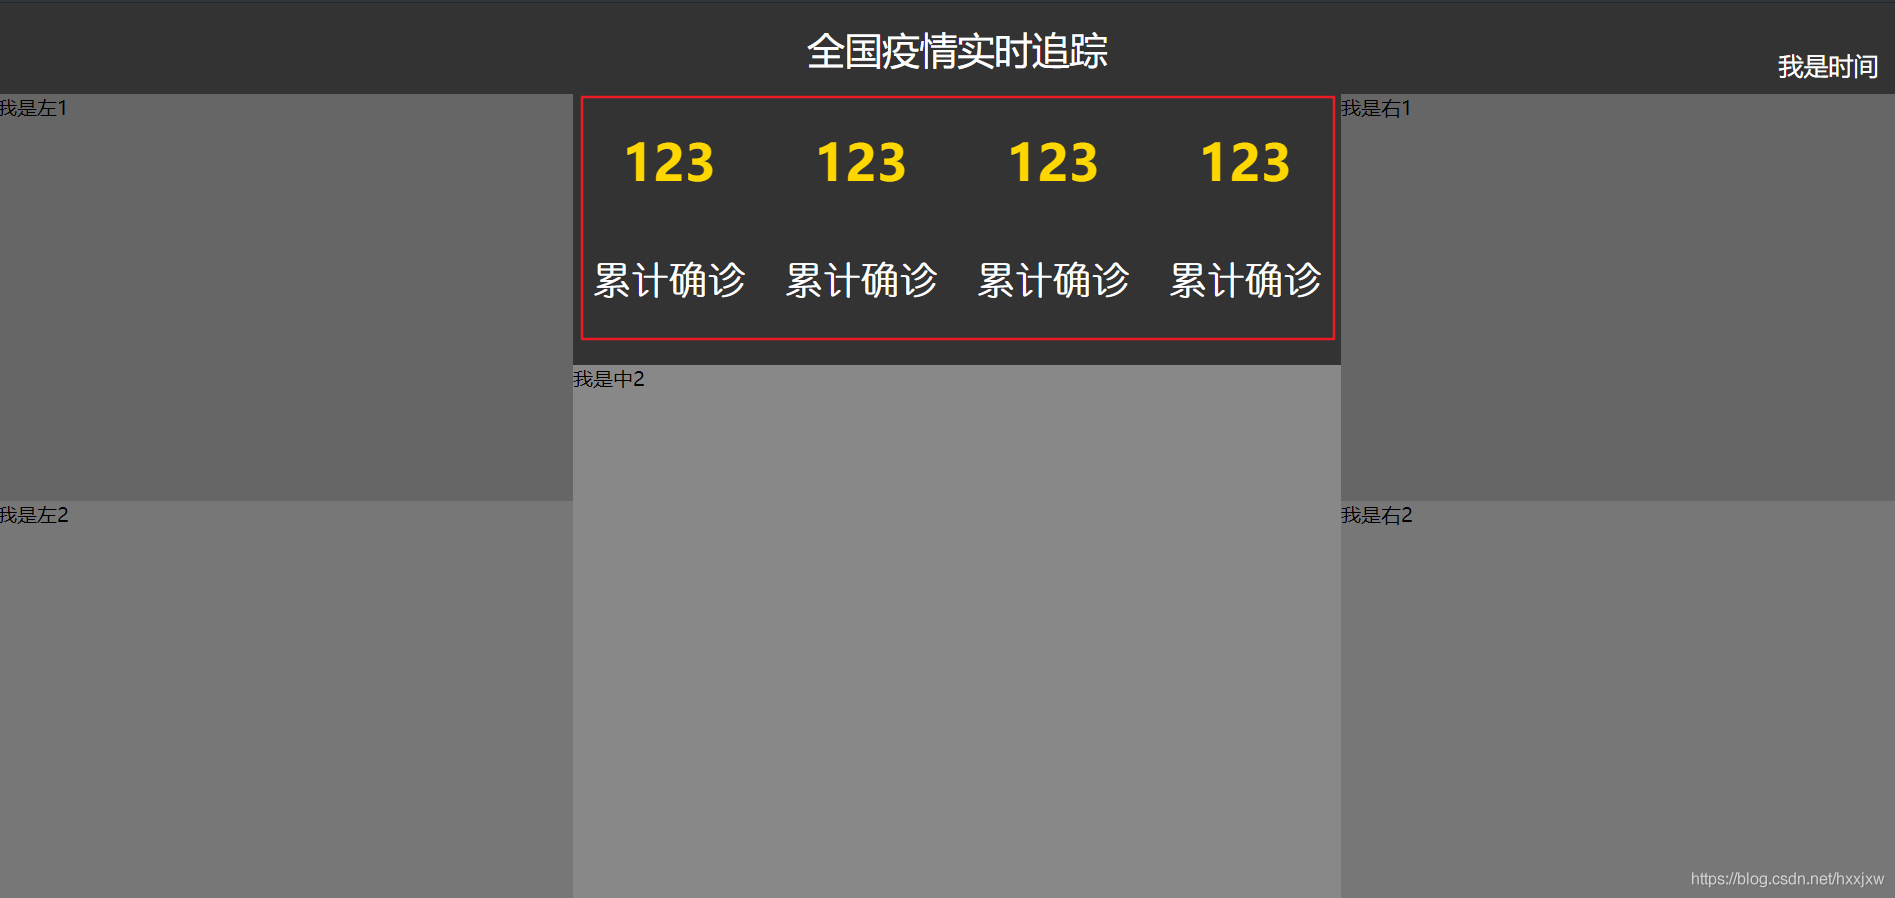
通过后台发起 AJAX 请求动态更改这里的值
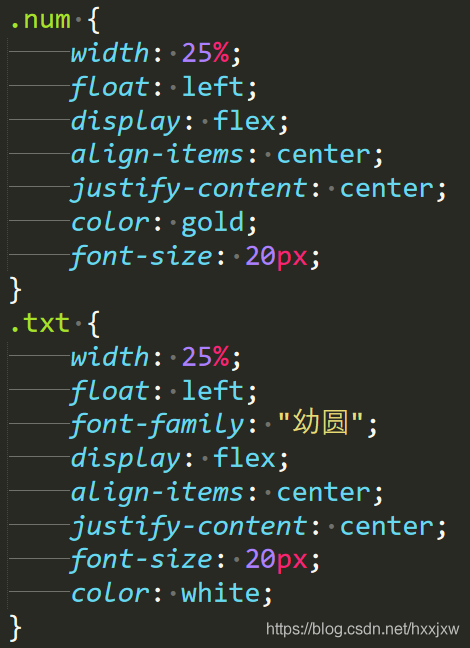
.num 是上面黄色数字的样式表
.txt 是下面白色文字的样式表
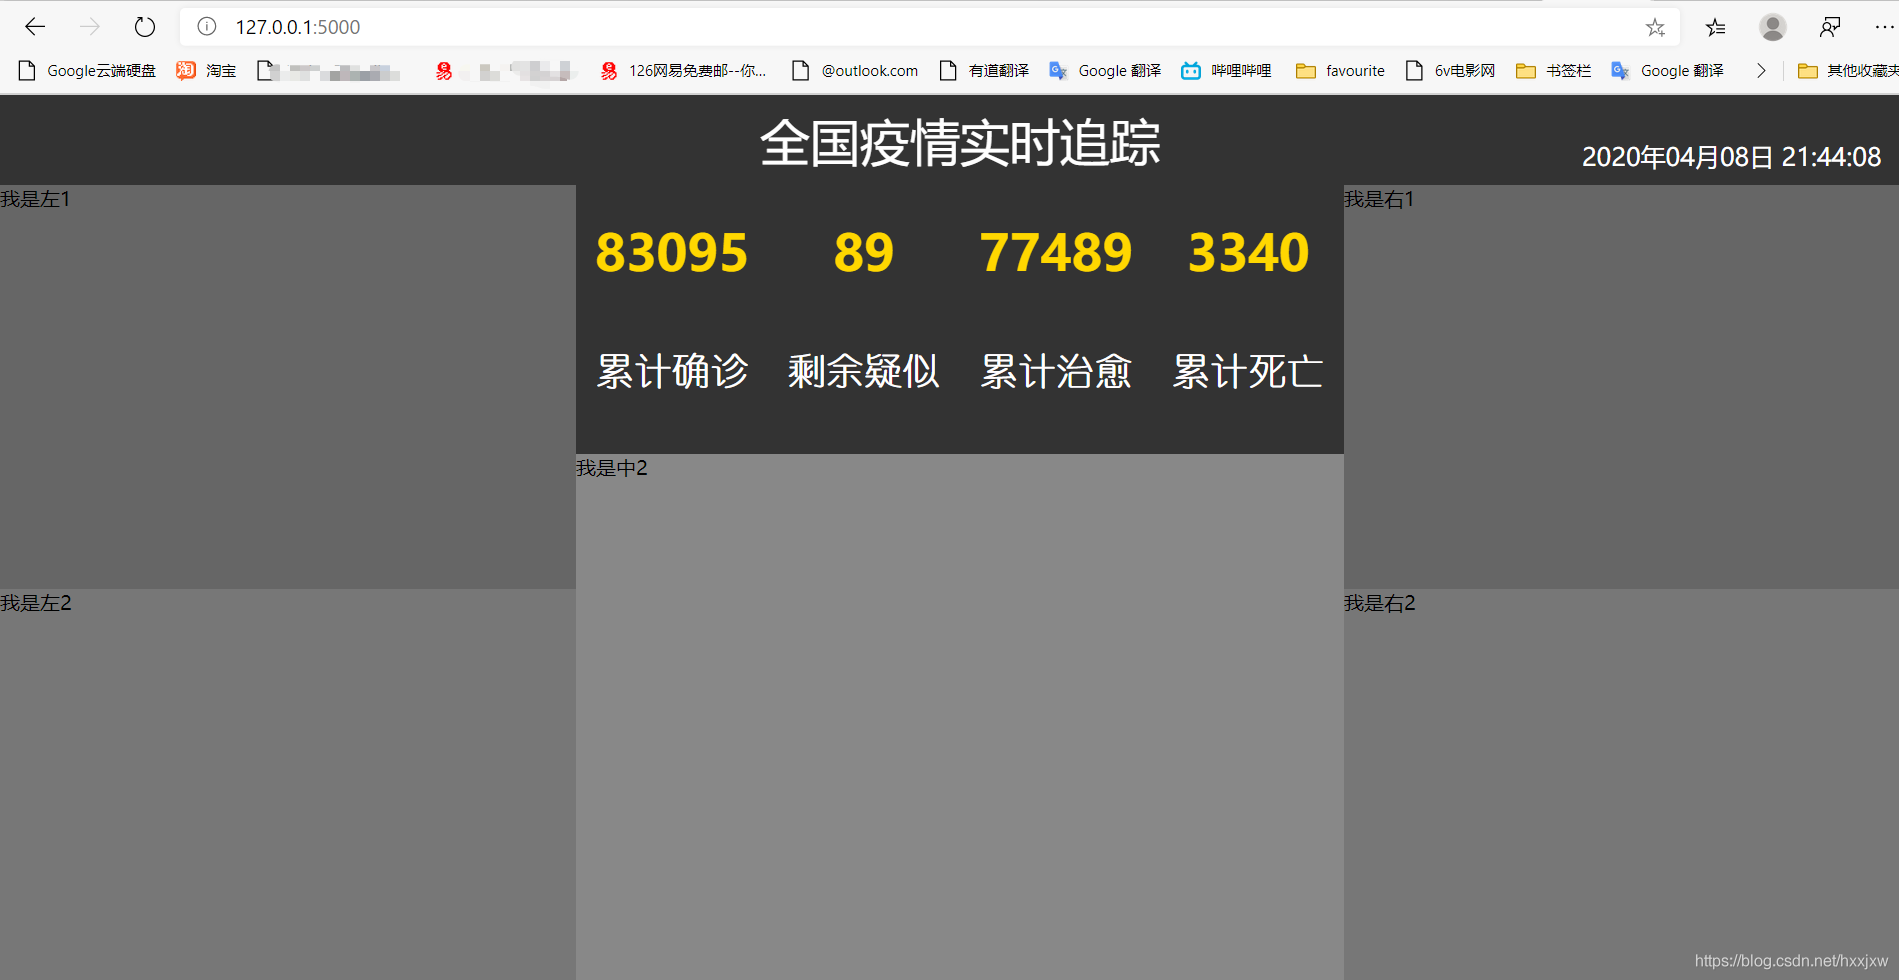
utils.py 里面的 get_c1_data()
controller.py 里面的 get_c1_data()
@app.route('/c1')
7、全国 yq 地图的实现
复制中国地图 option,导入 china.js 从数据库中获取数据 通过 AJAX 请求,把数据设置到 option 对应的 data 里面去
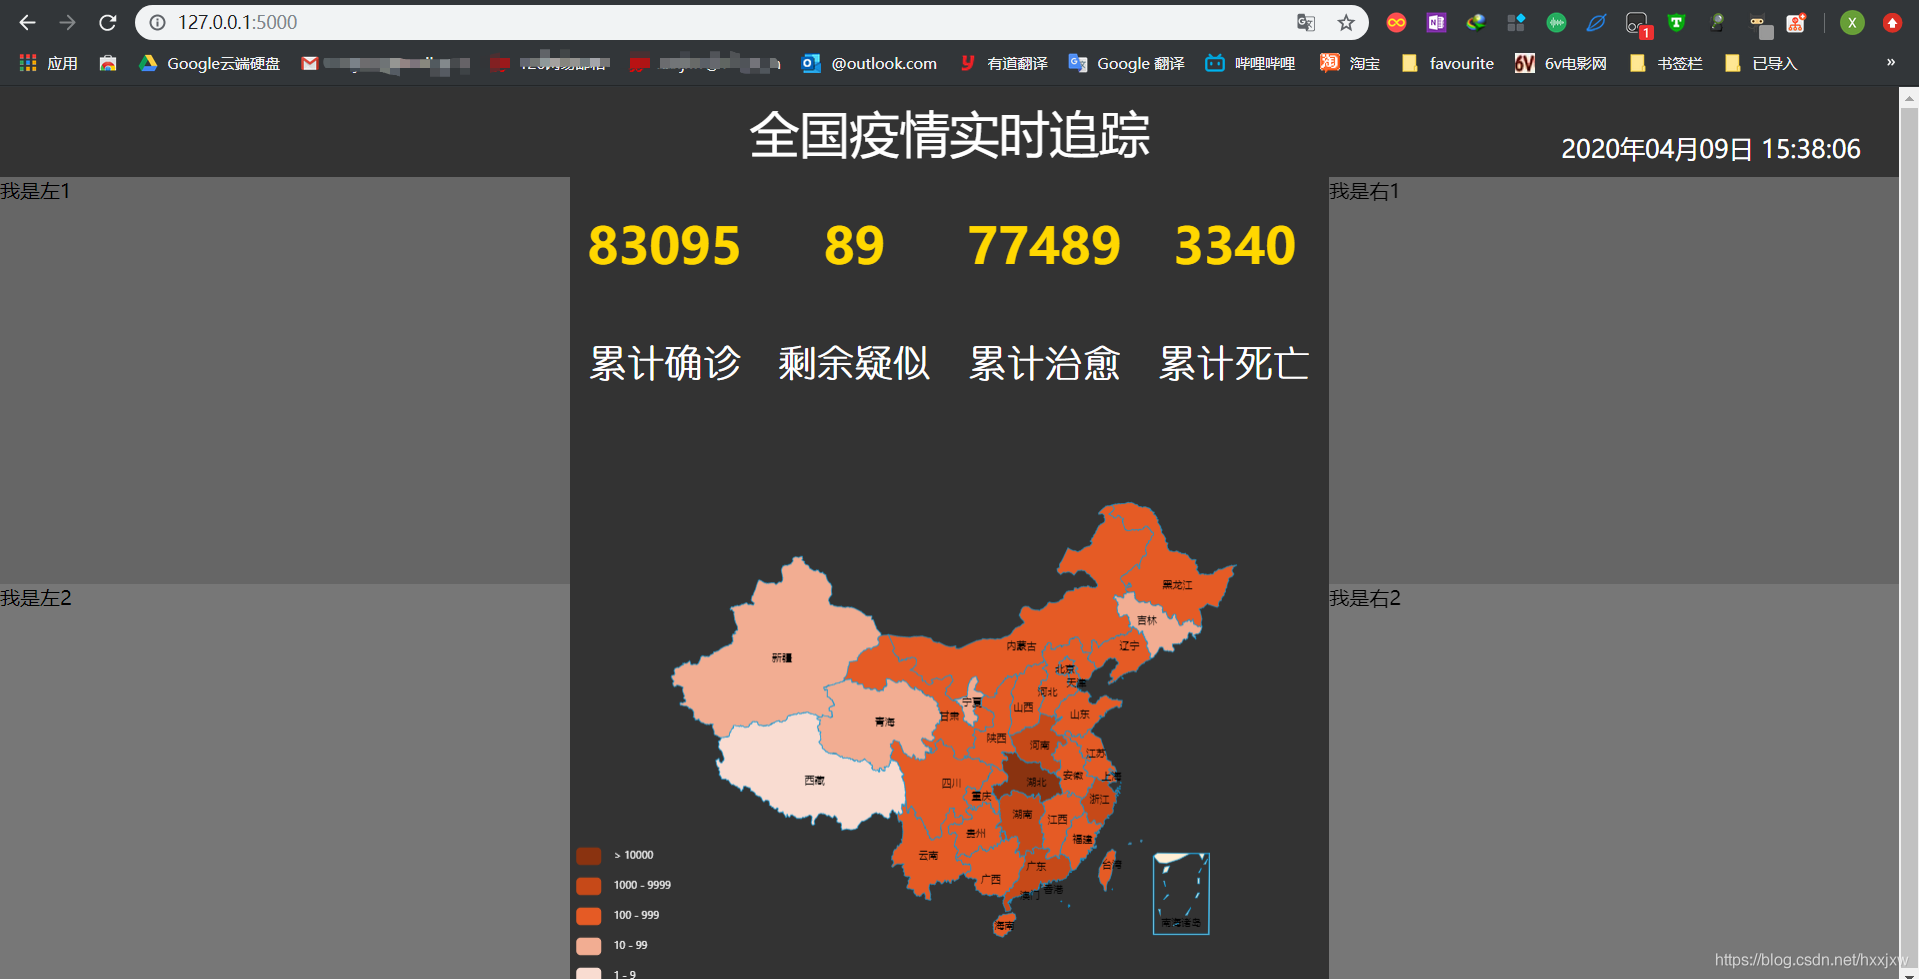
ec_center.js
utils.py 里面的 get_c2_data()
controller.py 里面的 get_c2_data()
@app.route('/c2')
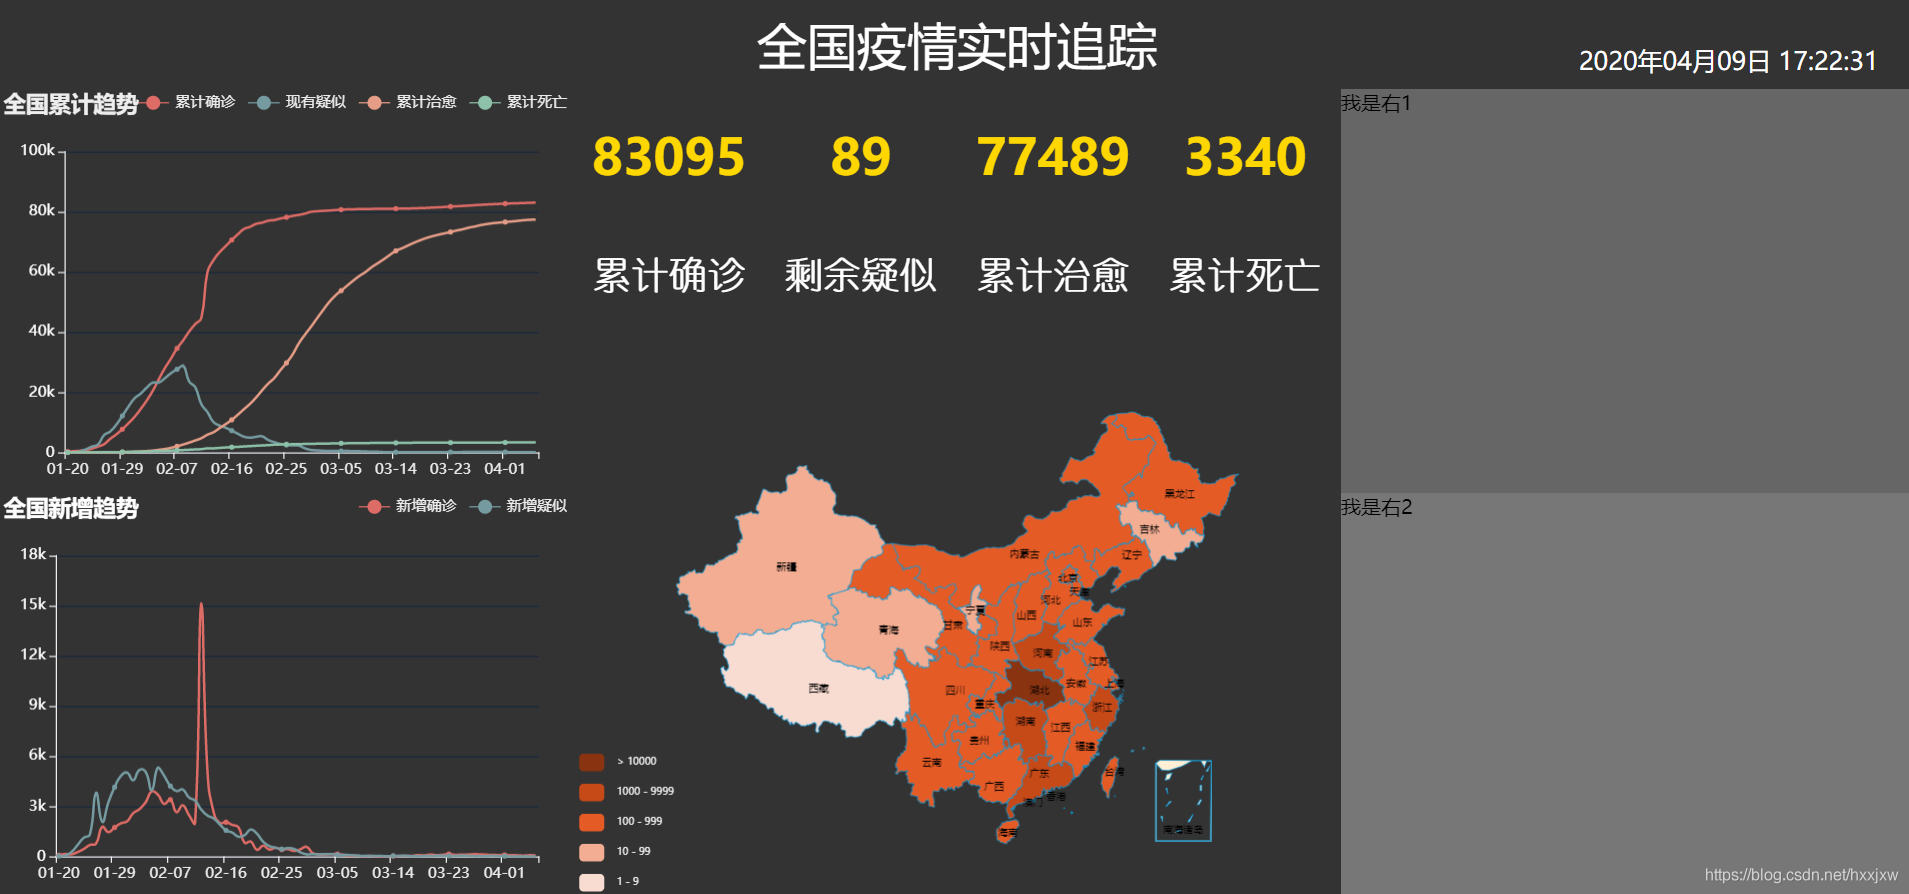
8、全国累计和新增趋势的实现
全国累计趋势
复制折线图 option
从数据库里面获取数据
通过 AJAX 请求,把数据设置到 option 对应的 data 里面去
ec_left1.js
utils.py 里面的 get_l1_data()
@app.route("/l1")
controller.py 里面的 get_l1_data()
新增趋势
和全国累计趋势的设计基本相似
ec_left2.js
utils.py 里面的 get_l2_data()
@app.route("/l2")
controller.py 里面的 get_l2_data()
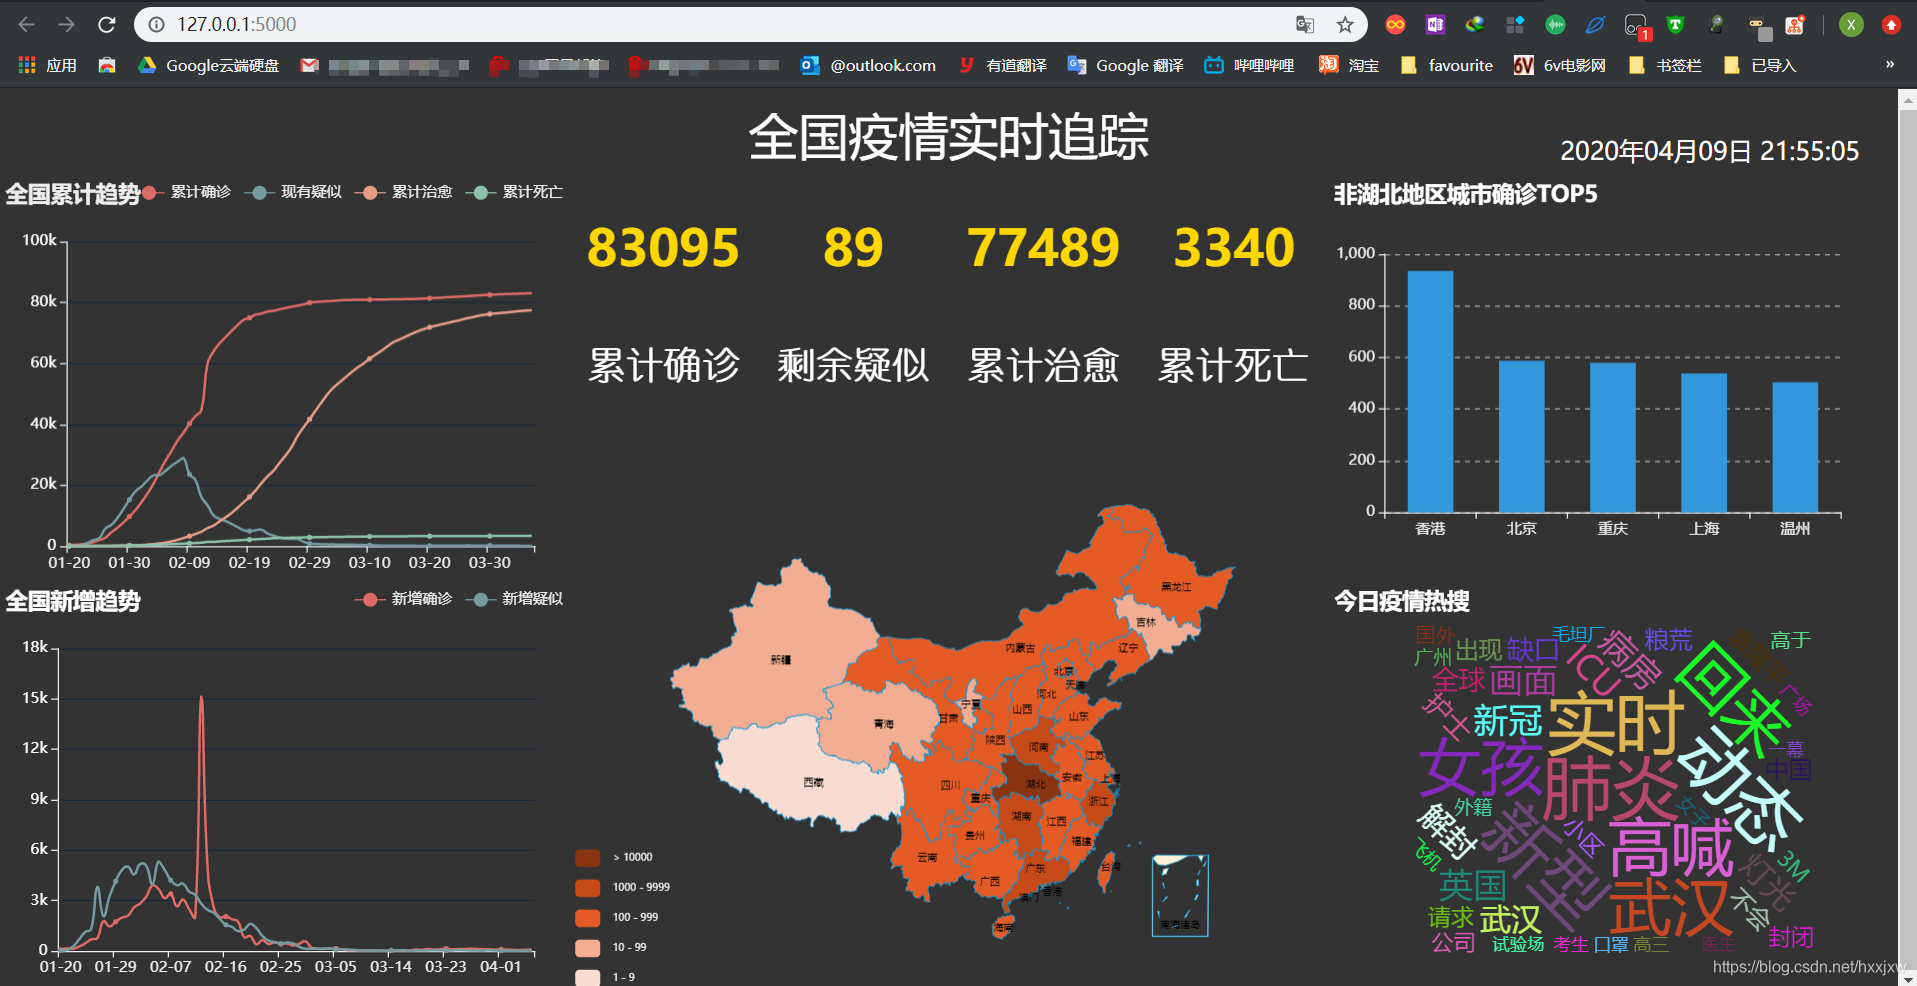
9、非湖北城市 TOP5 和今日热搜词云图
复制柱状图 option 从数据库里面获取数据 通过 AJAX 请求,把数据设置到 option 对应的 data 里面去
词云图需要 jieba 分词库
ec_right1.js
utils.py 的 get_r1_data()
@app.route("/r1")
controller.py 里面的 get_r1_data()()
ec_right2.js
utils.py 的 get_r2_data()
@app.route("/r2")
controller.py 里面的 get_r2_data()
到此位置,整个项目可以运行
如果要运行的话,首先将数据库 cov 的 3 个表的数据都清掉,否则再次插入会报错
先运行 spider.py,爬取实时数据存到数据库里
然后运行 app.py 从数据库中读取并可视化显示


10、项目部署
开发模式部署
开发模式就是专门用来做程序调试用的


将之前 ec_certer.js, ec_left1.js, main.html 等文件中的预设的值都清掉
之前的 123 和时间也给清掉
检查是否清空的方法是打开 main.html,看是否图表里还有数据
这样就好了

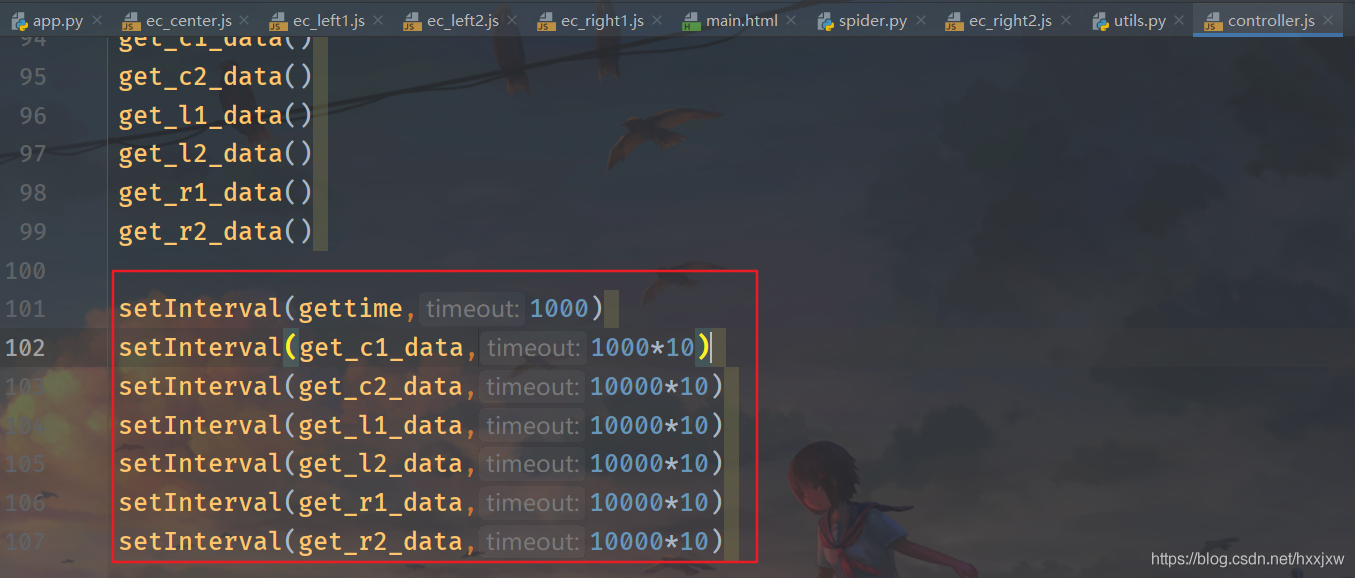
再给 controller.js 里面添加定时循环更新
开发模式修改 app.py 的运行端口为 0.0.0.0
  python
if __name__=="__main__":
    app.run(host="0.0.0.0")
0.0.0.0 就是不限制任何 ip 地址
部署的阿里云主机上的 python 是 3.6,我们开发时是 3.7
运行的时候会有一点点小问题
app.py
@app.route('c1')
改动前

改动后

生产模式部署
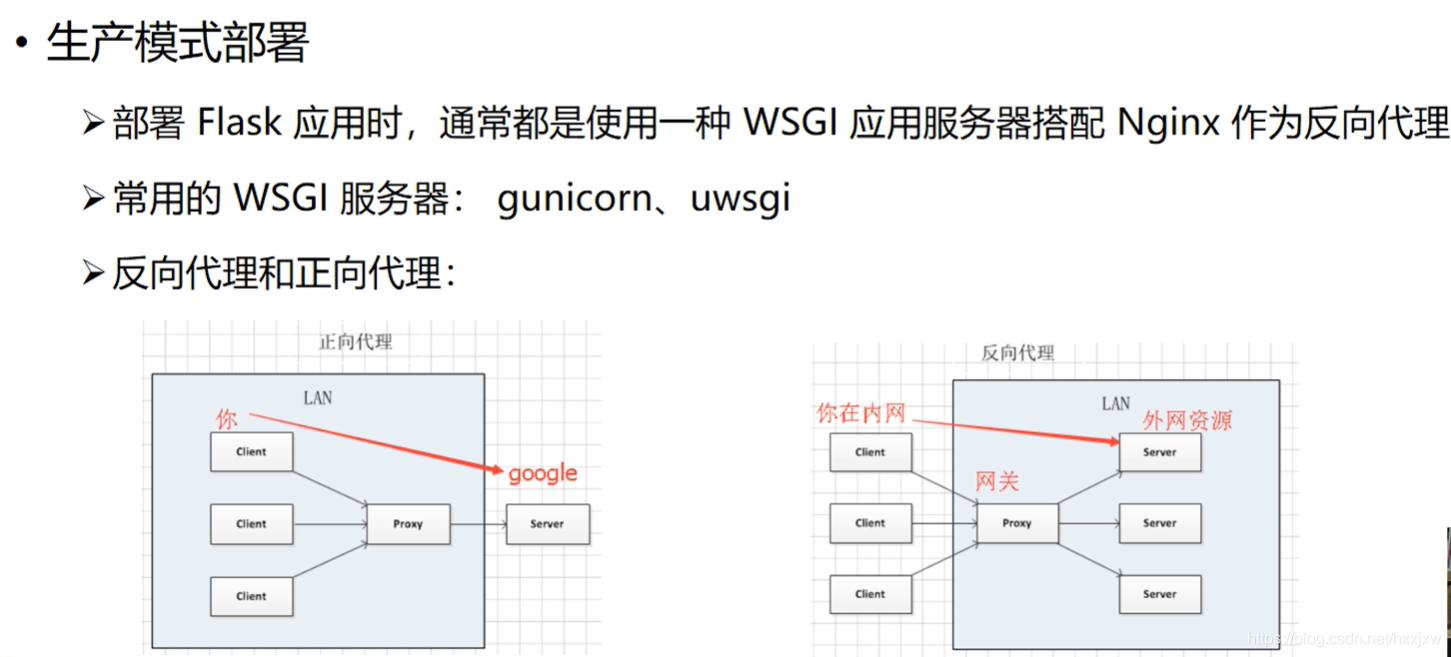
正向代理&反向代理
正向代理
``` 正向代理就是例如fq,通过代理服务器访问某个网站资源
我访问google,先发请求给代理,代理把我想要获取的数据的请求发给google;google根据请求返回数据给代理,代理再返回给我。但给我们的感觉像是我直接访问了google
对于google而言,所有使用同一个代理的人,它不知道是谁真正在访问它,它只知道是这个代理
即正向代理隐藏发起请求的人 ```
反向代理
``` 例如访问百度,域名www.baidu.com, 你也访问百度,他也访问百度,这个时候由于访问的人数很多,百度如果只用一台服务器来提供服务就可能扛不住这波压力。
它就可以采用反向代理的方式,我们都通过访问同一个网关,网关可以判断每一个人访问的权重值,根据权重值把你的请求发给第一台服务器,我的请求发给第二台,他的请求发给第三台。此时在我们看来我们都访问了同一个地址,但是在服务器内部其实已经分流到了不同的电脑之上。这也就是负载均衡
可以使用nginx作反向代理的网关实现负载均衡。 ```
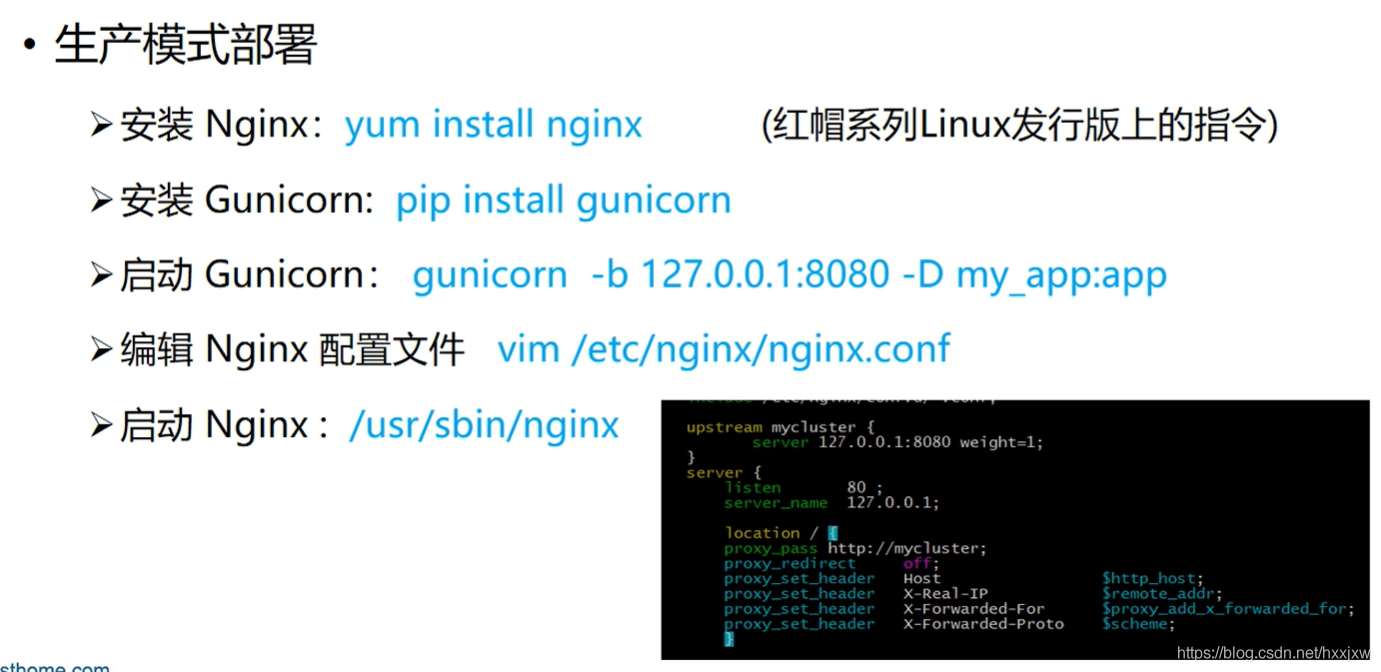
步骤: 在阿里云购买学生机,centos8.0 64 位(自带了 python3.6)
安装 MySQL, 参考 https://blog.csdn.net/qq_26975307/article/details/89390208 ,本来想装 5.7,结果装了 8.0
修改了 app.py
安装 python 相关库
python
pip3 install flask
pip3 install jieba
pip3 install pymysql
pip3 install selenium
pip3 install gunicorn
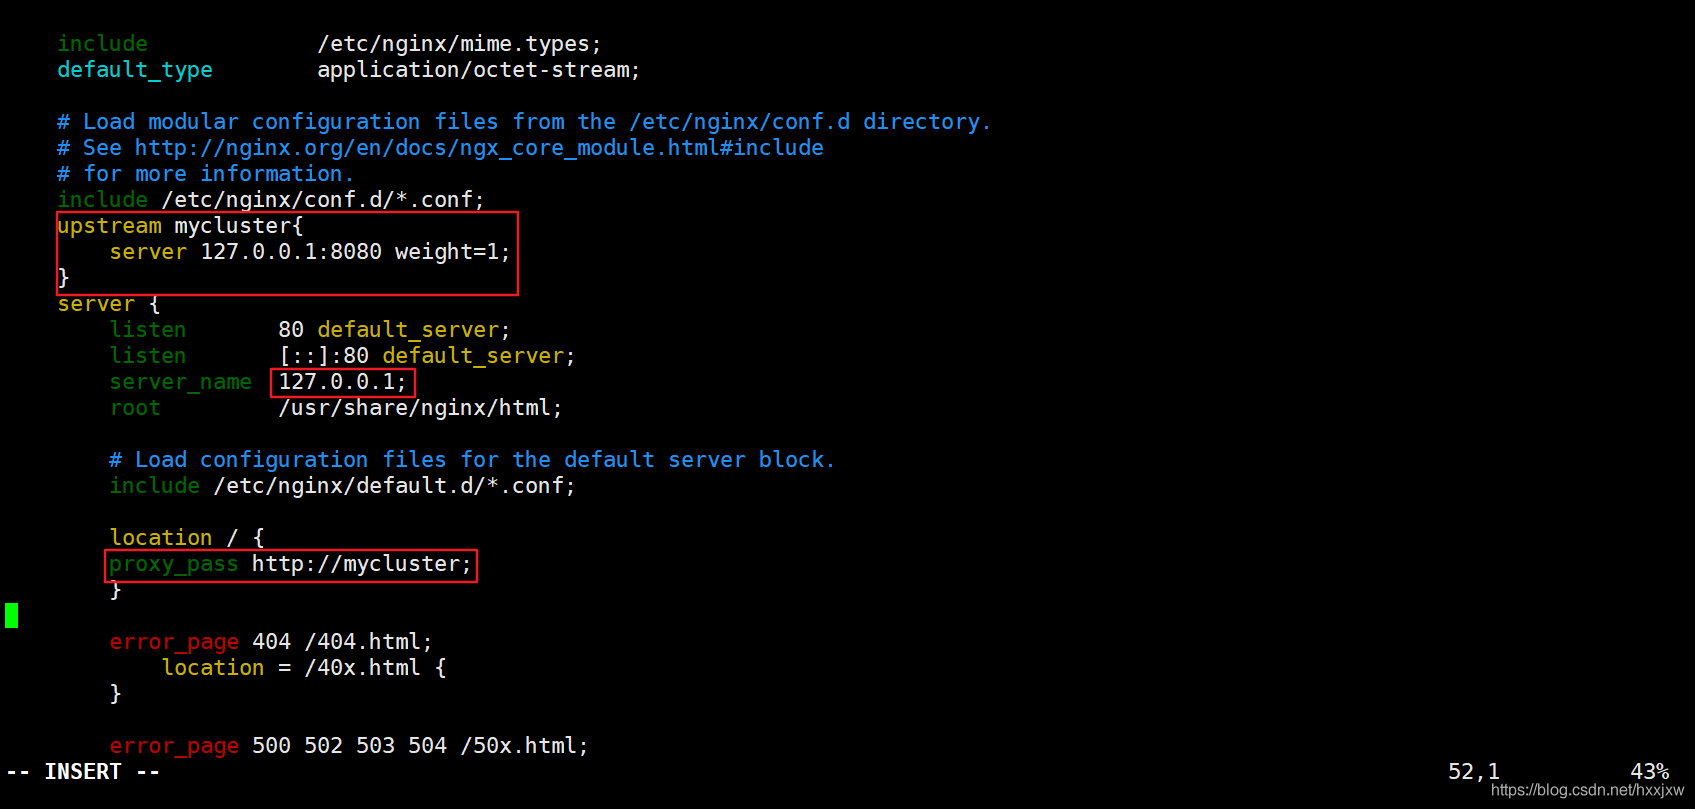
yum install nginx
编辑 nginx 配置文件
 在这里添加
在这里添加
启动 nginx
  bash
/usr/sbin/nginx
来到 Covid-19 Tracking 的目录下,运行
  python
gunicorn -b 127.0.0.1:8080 -D app:app
-D 是以守护进程的形式启动,以后台形式启动,不会挂在前端
此时从其他电脑访问访问可能还不成功,但是阿里云安全组也已经配置了 8080 端口了
原因是我们开启了防火墙,防火墙还没设置开放 8080 端口
两条命令
```bash firewall-cmd --zone=public --add-port=80/tcp --permanent
systemctl restart firewalld.service ```
之后打开就可以从其他电脑正常访问了

因为之前并没有往数据库里写数据,所以都是空的
部署定时爬虫
首先要安装 selenium 用到的 chromedriver

安装 Chrome 就是 yum install https://dl.google.com/linux/direct/google-chrome-stable_current_x86_64.rpm
查看 Linux Chrome 的版本
  bash
google-chrome --version
我是根据 Chrome 的版本在本机下载后上传到云主机的

之后就可以了
来到 COVID-19 Tracking 目录下
```python python3 spider.py up_his
python3 spider.py up_det
python3 spider.py up_hot ```
数据库就会有数据了


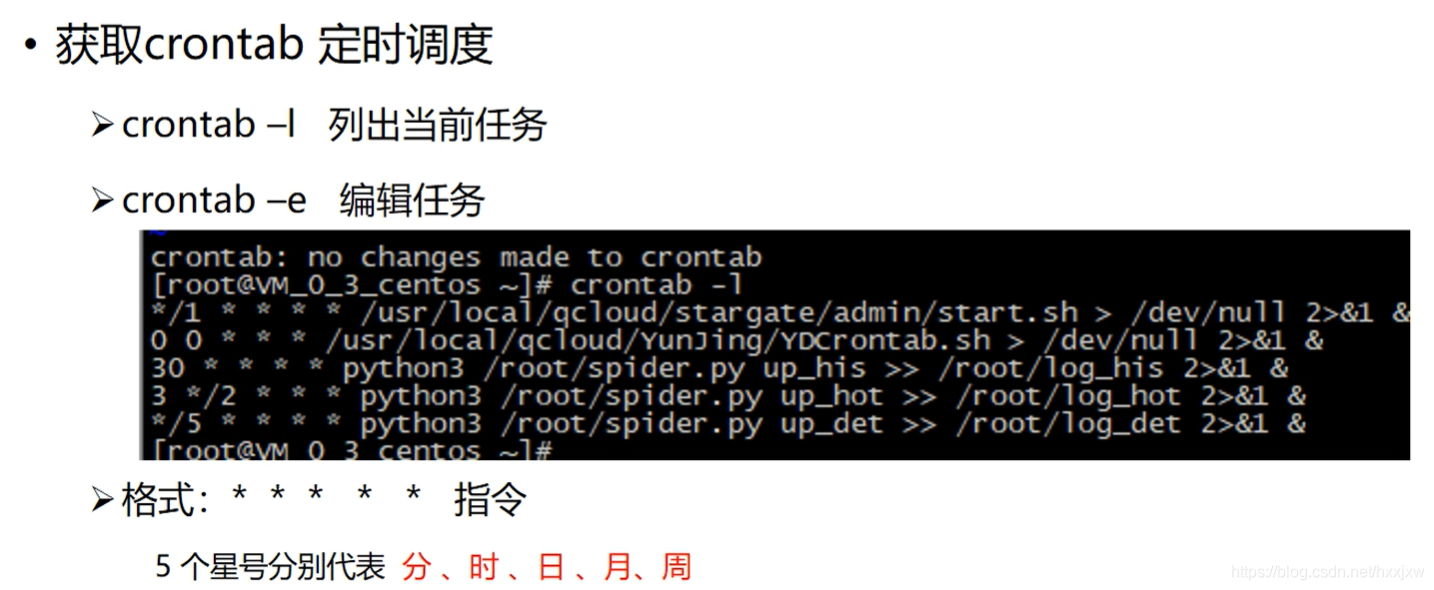
crontab -e 会弹出一个文件,在里面输入你的命令

意思是:
每小时的第 30 分钟执行一次这个脚本 每两小时的第 3 分钟 每 30 分钟执行一次这个脚本
2>&1 是将标准错误重定向到标准输出
&是后台执行
之后输入 crontab -l 查看任务列表

成功
之后服务器会定时执行脚本
至此,项目完结!
其实我觉得应该每次写入数据前先清空之前的数据表的,但既然视频上没有这样操作,也就先不改了。要想改也不难
参考文献
- 基于标记模板的分布式网络爬虫系统的设计与实现(华中科技大学·杨林)
- 基于J2EE的网络舆情分析系统的设计与实现(南京大学·李伟)
- 基于BERT-CNN的舆情分析及可视化系统的设计与实现(西南大学·张俊龙)
- 基于互联网医疗大数据的分析平台设计与开发(浙江工业大学·靳继伟)
- 新冠疫情信息追踪及趋势预测系统的研究与实现(辽宁大学·李鹏)
- 基于BERT-CNN的舆情分析及可视化系统的设计与实现(西南大学·张俊龙)
- 基于爬虫与文本挖掘的网络舆情监控系统设计与实现(首都经济贸易大学·李妙钰)
- 基于互联网医疗大数据的分析平台设计与开发(浙江工业大学·靳继伟)
- 基于J2EE的网络舆情分析系统的设计与实现(南京大学·李伟)
- 基于机器学习的新冠肺炎疫情数据可视化分析研究与实现(吉林大学·刘莉萍)
- 基于互联网医疗大数据的分析平台设计与开发(浙江工业大学·靳继伟)
- 基于Storm云平台的分布式网络爬虫技术研究与实现(电子科技大学·付志鸿)
- 基于互联网医疗大数据的分析平台设计与开发(浙江工业大学·靳继伟)
- 基于Na(?)ve Bayes算法的定向爬虫系统设计与实现(山东师范大学·张宏宽)
- 新冠疫情舆情信息分析系统的设计与实现(华中科技大学·胡永辉)
本文内容包括但不限于文字、数据、图表及超链接等)均来源于该信息及资料的相关主题。发布者:源码驿站 ,原文地址:https://m.bishedaima.com/yuanma/35631.html